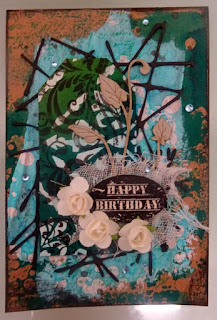
I had actually made the bases for these cards a few weeks ago, but I put them under my craft mat to dry without warping and must have forgotten about them. Sofie from Scrapmatts had just sent me out a new shipment of chipboard as part of their DT so I decided to combine the new chippies and stencils to add to my stash of birthday cards to have on hand for emergencies.
I find the most difficult part of creating cards is coming up with the design, so you can save some time by creating a few in a similar design each time. If you're interested in making something similar, here is how I made them:
Prep the background
1/ Cut your base cardstock to size. Mine are 4'x6'.
2/ Smear white gesso over the front and allow to dry.
3/ Spray mist through a stencil. I used pink Glimmermist through ST5007 which has given a very subtle effect for the card on the right and aqua Dylusions through ST5003 for the card on the left. Because the Dylusions ink pooled on the stencil I then flipped it over and used the excess like a stamp to get the reverse image on the middle card.
4/ Splatter black ink over the cards. Put aside for mists/ink to dry.
5/ Randomly stamp a script image over the background.
6/ Edge the card with black ink, applied in a messy fashion.
Create the tags
7/ On a scrap of kraft cardstock, apply white gesso through a stencil. I used ST5023 and ST5024. These are new stencil designs and I just LOVE them! Wait for the gesso to dry before moving on (even though you can see from my smudge I didn't wait).
8/ Mist randomly over the cardstock. I found Glimmermists didn't give me a bold enough coverage so used Dylusions instead. Wait for the ink to dry.
9/ Stamp a decorative image over the top in black ink. I used a Kaisercraft stamp which was the perfect width to then create tags from.
10/ Cut the cardstock scrap down into different sized tags.
Assemble the card
11/ Colour the background chipboard (CB5151 Webbing 01) black, I used stamp ink.
12/ Adhere the tag to the left side of the card using foam mounting tape.
13/ Adhere the webbing chipboard around the tag. I only used one piece for all three cards (and even have a bit left over) because I cut it into smaller sections and placed these around the tag.
14/ Adhere the leaf spray chipboard (CB1235 Leaf Spray 14). There are only two sprays in the pack but I again cut it down into pieces to suit my cards.
15/ Cut three small rectangles of muslin and distress these. Adhere over the bottom of the leaf sprays.
16/ Adhere the Happy Birthday sentiments (CB1243 Scrap Words 29) using foam mounting tape.
17/ Adhere three small white flowers to the bottom left of the sentiment.
18/ Scatter rhinestones across the card.
I hope you enjoyed the tutorial. If you do make a similar card please let me know and if it contains Scrapmatts chipboard don't forget to upload it to our Ning site, we would love to see your creations.


No comments:
Post a Comment
Thanks for commenting, I really appreciate it!