Showing posts with label Couture Creations DT. Show all posts

Thursday, 26 March 2015

Smile Layout - Couture Creations DT

**Don't forget to enter my giveaway!**
 
Welcome back for my final reveal as part of the 2014 Couture Creations Design Team. I have made lots of cards and off the page projects for this team recently but it has been ages since I did a layout so I decided that would be the perfect project to end on. I've had a great time playing with all the fantastic Couture Creations products and hope you have enjoyed seeing my projects over the past year.
 
 
Photo credit: Juniper Blooms Portraiture
 
1/ Take your background paper (I used Rouge Stripes) and in pencil lightly mark guidelines at 1.5", 3.75", 6", 8.25" and 10.5" both horizontally and vertically. Use a brown pen to draw in faux stitches over the top of the middle three lines both horizontally and vertically.  
2/ Cut two strips of paper 1.75" x 4" and eight squares 1.75" x 1.75" from various papers from the paper pad. Edge all of these in brown ink. Adhere as shown in the photo, raising two using foam tape or cardboard for added interest.
3/ Cut 'Smile' die cut from Everyday Essentials and two of the decorative square frame from Hearts Ease from thin cardboard. Emboss all of these in two coats of brown embossing powder.
4/ Trim your photo to 4" x 4" and adhere the square frames to the corners, cutting away the parts behind the photo. Place three pearls in the corners of the frames. Adhere to the background, raising it up using foam tape or spare cardboard.
5/ Add your title to the top corner. Add embellishments to each square and some journaling strips, also edged in brown.
 
 
Couture Creations Materials List:
 
http://lozcraft.blogspot.com

Wednesday, 4 March 2015

Smile Card - Couture Creations DT

Do you ever fall in love with a paper range so you buy the whole paper pad? Then you get a couple of projects in (eleven in my case) and you start to get sick of the same colours/designs etc so the pad gets relegated to the bottom of your supplies. I was feeling that way about the Vintage Rose Garden range and was a bit over the pink/green/cream colour scheme, but then I realised that I could easily use some of those papers in a different way with just a bit of alteration and some fresh eyes. This card was the end result of that experiment.


1/ It looks like I've used a chipboard piece on this card, but it's actually a die cut from the Hearts Ease range. I cut this piece three times from thin cardboard (an old cornflour box), glued them together with adhesive spray and then gave it a coat of gesso.


2/ Get your background paper ready. Cut a sheet of plainer patterned paper to just smaller than 6" x 4", I have used a cream checked pattern. Adhere it to a piece of thin cardboard to give it some stability. Ink the edges with a dark orange ink then distress. Apply gesso over the top of a stencil to add a new pattern. Randomly stamp a texture stamp over the background in dark orange ink.


3/ Glue the die cut to the lower left corner of the card. Flick some orange ink across the card and use a wet paintbrush to spread it over the die cut. Once the orange ink is dry, flick some yellow ink over the card too.


4/ Die cut the 'Smile' sentiment twice, once from orange cardstock and once from white. Use adhesive spray to stick them together slightly off-set so it's like the white is a shadow.


5/ Adhere the sentiment to your card. Place some flowers at the top of the die cut and sprinkle some pearls around the card. To finish simply apply the background to a white cardstock base card.


Couture Creations Materials List:
http://lozcraft.blogspot.com

Friday, 20 February 2015

Live Love Card - Couture Creations

Welcome back! How funky is the Everyday Essentials range of dies? They are so versatile. Today I've used the 2 Tags and Bird Branch set to create this card.
 
 
1/ Pick three sheets of patterned paper to be your background mat. Cut the largest to 6" x 4" and the next two each slightly smaller than that.
2/ Using a sponge dauber, apply some brown ink through a stencil onto the smallest mat. Ink all the edges of the three sheets in brown ink and distress the edges. Use double sided tape to stick them together.
3/ Cut one of the larger tag dies and cut that in half long ways. Ink the edges in brown.
4/ Cut the smaller tag die in a neutral colour and ink edges in brown. Mount this on some spare cardboard so it will be raised.
5/ Cut the bird from green paper.
6/ Cut a banner shape from red paper. Cut the two sentiments from patterned paper.
7/ Adhere the banner strip first, then slide the two halves of the large tag just under the edges and stick down.
8/ Adhere a length of ribbon down the centre of the banner. Adhere the sentiments over the ribbon to help keep it in place.
9/ Adhere the bird branch to the small tag and then the small tag to the centre of the card.
10/ Apply pearls as in the photo and you're done!
 
Couture Creations Materials List:
CO724134 Everyday Essentials, 2 Tags & Bird Branch die


http://lozcraft.blogspot.com
 

Wednesday, 4 February 2015

High Tea Invitation - Couture Creations

Welcome back! Lauren here with a High Tea Invitation card to share with you today. The Vintage Rose Garden paper collection is just perfect to create a shabby chic invitation card with.


1/ Cut off-white cardstock to size, I used 10" x 6". Fold in half to create your card base.
2/ Cut the green background paper to a size slightly smaller than your card base and the pink background paper slightly smaller again.
3/ Ink the edges of both background papers with a brown ink pad and then distress. Adhere to the card with double sided tape.
4/ Die-cut the leaf frame from green patterned paper and adhere to the pink paper using adhesive spray.
5/ Paint the tag of the tea-bag with gesso and set aside to dry. I needed to use a couple of coats on mine.
6/ Tie a bow in a length of lace and adhere to your card near the bottom. I used double sided tape to keep the loops in place too.
7/ Scatter pearls around the card, using two colours and multiple sizes for interest.
8/ Cut your sentiment word and attach to the teabag. Adhere the teabag to the front of your card.
9/ Give invitation to your proposed high tea companion and enjoy a wonderful day out together! :)

Couture Creations Materials List:


http://lozcraft.blogspot.com

Monday, 2 February 2015

2015 Couture Creations Design Team Call

I'm still working on my secret project (which is coming along nicely so far) so no art to show at the moment, but I do have something exciting to share. Couture Creations is looking for a new design team!

Do you love creating with Couture Creations Embossing Folders and Dies?
Do you love creating fun and innovative projects?
 
Do you have an active blog?
Are you active on Social Media?
Do you take fabulous photographs and write great steps by step instructions?
If you said YES to all of the above we would love you to apply join our 2015 Design Team …we are looking for a new Design Team to represent our brand with fabulous projects that make Couture Creations products the star of the show.

If you are successful your commitment to our Design Team will be for a FULL 12 MONTHS and will run from April 2015 through to March 2016.

Benefits to you for being on our team include:
 
  • Receive a generous starter kit filled with Couture Creations products including tools and adhesives.
  • Receive Couture Creations new releases before they are released
  • Product from other companies that we will be partnering with throughout the year.
  • Exposure on our blog and through our International Distributors.
  • Exposure in our Creative Inspiration Magazine (this is our FREE Magazine that goes to all stores stocking our products internationally and is also available online)
  • Have your projects displayed at Craft Shows including CHA
  • Possible Teaching opportunities.
 
What we require from you: FULL 12 MONTH COMMITMENT 
with
  • 2 posts per month posted on our blog with step by step instructions, product list and photos. These can be  Layouts, Cards, Mini Albums, Off the Page or Home Décor projects, you can mix it up or do what you are most comfortable doing. (You will need to send through the HTML code for your blog posts by the 1st of each month)
  • 4 Projects with full product list (and if needed step by steps) for our Creative Inspiration Bi Monthly Magazine, these will need to be posted to us to be professionally photographed. (so 4 projects every two months for the magazine)
  • Take part in Blog Hops with our partnering companies.

  • In the lead up to CHA we will ask for extra projects for display on our stand at CHA.


How do you apply?

Email kerrie@artdecocreations.com.au by midnight Sunday 15th February 2015 AEST including the following;
* Full contact information (name, address, contact number, email address, web/blog address)
* Tell us a little bit about yourself and what you think are your design strengths
* Tell us why you would enjoy being part of our design team
* Let us know if you have been on or are now in any other design teams.
* On your blog, create a post including a minimum of 5 projects that you have created using Embossing Folders and Decorative Dies preferably using Couture Creations products, this way we can see how creative you are with our products. If not Couture Creations products please make sure you do use embossing folders and or decorative dies in your projects we want to see how creative you are using these product lines.

***You must send a direct link to your audition post in your email to us.
*They do not have to be new projects but we will also be looking at your photography skills as well as tutorials on your blog.

Title the post “Couture Creations 2015 Design Team Audition”
 
(You must have an online presence to audition for our design team)
 
We ask that our designers have a dedication to our brand and would like applicants to NOT be serving on more than 3 design teams and on no design teams that have similar products to us for the duration of your term.

Depending on how many entrants we have we may also introduce a final round, but entrants from this first round will be chosen by the 22nd Feb 2015 and notified via email..

Due to tight deadlines this year our design team call this year is open to Australian Designers only.

We will announce our 2015 Design Team on the 1st March.  

Please do share this post with anyone you think maybe interested in joining the 2015 Couture Creations Team.


Wednesday, 21 January 2015

Vintage Rose Garden Dreamcatcher - Couture Creations DT

So it's January - a new year, a time for new resolutions and best of all a great time to try a new project! This dream catcher is a surprisingly quick and easy project which looks great, in my opinion anyway. :)
 
 
1/ Take the inner circle of an embroidery hoop and pick a crochet doily which will fit inside. Using embroidery thread, loop through the doily and over the frame all the way around until it is securely attached in the centre.
2/ Adhere double sided tape over the outside of the hoop. This will secure the position of the thread and also secure the twine which now gets wrapped around the hoop, I found multiple shorter lengths are easier to wrap. Remember to include a loop at the top for hanging.
3/ Cut and emboss four feathers from neutral coloured Vintage Rose Garden papers. Punch a hole at the end of each of these. Run a brown inkpad around the edges and over the embossed areas to highlight these. Use more twine to hang each of the feathers from the hoop. I looped mine through itself to secure and hung a green bead at the other end of the twine.
4/ Tie an assortment of ribbons and laces to the bottom of the hoop, varied lengths and widths look best. Hang a couple of extra beads using embroidery thread
5/ Cut a small circle from spare cardstock to create a stable base to build your floral cluster upon and adhere to the hoop with hot-glue or double sided tape. Create a flower using the Roses nesting dies (I used two layers of the three smallest dies, inking the edges then wetting and scrunching each layer before assembly). Adhere the die-cut flower, a fussy-cut clock image and some smaller flowers to the base cardstock.
6/ Die cut the leaf frame and cut in half. Adhere the left side to the hoop using spray adhesive.

 
Couture Creations Materials List:
CO723218 Nesting Dies, Roses
 
 
http://lozcraft.blogspot.com

Tuesday, 30 December 2014

Floral Mask - Couture Creations DT

Whenever I feel like I'm getting stuck in a creative rut I like to create an off-the-page project to change it up and try some different techniques. This month I have decorated a paper-mache mask which is now a lovely display piece in my craft room.


1/ Start by purchasing a cheap mask from your local craft store, mine was about $5. Remove the elastic. Cover the mask in torn up pieces of old book paper using PVA glue, mod podge or a watered down polymer resin. This paper is quite thin so moulds to the shape of the mask easily. Once the mask is dry trim the edges to the shape of the mask and re-punch the holes at the sides where the ribbon will go.


2/ Fussy cut a number of butterflies and flowers from various Vintage Rose Garden papers. How many you cut is up to you and will depend on the size of your mask. I applied some Crystalina Glitzin' Glamour to the wings of the butterflies and highlights of the flowers for some added sparkle.


3/ To create the 3D flowers, using the scalloped circle nesting dies cut three circles of the three smallest sized die and two of the next smallest size. Make cuts leading towards the centre (only cut about 2/3 of the way in) from every second scallop. Spritz each circle with water and scrunch up into a ball, leave to dry. Once dry, gently partially unfold the die cuts. To create the big flower I used two layers of each of the two largest sized dies and one of the next size down. The small flower uses two layers of the smallest size circles and the medium flower uses the remaining four die cuts. Each flower is held together with a brad.

4/ Apply your trims. I have used lace along the top of the mask and twine along the bottom and around the eyes. I also used a border die cut from the Vintage Rose Collection along the bottom of the mask. This is attached to the inside of the mask, start at the centre/nose and work your way out to the edges to make sure the pattern is centered. Now is a good time to add your ribbon ties at the sides too.

5/ Adhere the die-cut flowers to the outer edges of the mask using foam tape. Layer up your fussy cut flowers and leaves on the left side of the mask. You may need to cut these down into smaller sections to get the best positioning for your mask shape. Once you're happy with their placement, place a pearl in the centre of each fussy cut flower. I variered the size of the pearl depending on the size of the flower.

6/ Adhere a butterfly in each corner of the mask above the die-cut flowers. 


Couture Creations Materials List:
CO723041 Nesting Dies, Scallop Circle

http://lozcraft.blogspot.com

Tuesday, 9 December 2014

Christmas Card - Couture Creations DT

Welcome back and Merry Christmas to you! I couldn't go past creating a Christmas project for December, especially with the fantastic range of Christmas die-cut and embossing folders Couture Creations produces.


Interested in creating a similar card? Here is how I made mine:

1/ Cut your card base from kraft cardstock. Mine is 6" x 8", scored in the middle to form a front 6" x 4". Ink the edges in a brown ink.
2/ Cut the front piece from off-white cardstock just a bit smaller than the size of your card. I used an embossed letterpress technique to create the background image. To do this, you need to lightly wipe embossing ink over the raised design of an embossing folder. Place the cardstock in the embossing folder with the right side facing the ink and run through your machine to press the embossing ink into the recessed areas. Sprinkle the cardstock with embossing powder and tap off the excess. Depending on how cleanly you swipped on the embossing ink you may now need to spend some time cleaning up the image. Just use a small paintbrush to loosen any embossing powder you want to remove. Once you're happy with the design heat set it and stick it to the front of the card.
3/ Stick a piece of ribbon down the left hand side of the card.
4/ Cut your sentiment from the Christmas Banners in craft cardstock. Use a gel pen to highlight the letters. Ink the edges with your brown ink. Use double sided tape to adhere to the card at the bottom, this will also hold the letters in place so they don't pop out.
5/ Place a floral cluster to the left of the banners.
6/ Die-cut some Pine Needles from green paper and adhere around the floral cluster.


Couture Creations Materials List:
 
Feeling Sketchy is having a 'free sketch' theme this month, so card design is eligible to enter. May as well enter this one and see how I go! :)
 

http://lozcraft.blogspot.com

Monday, 1 December 2014

Couture Creations Creative Inspiration 6

Creative Inspiration volume 6 by Couture Creations is out now. I have a number of projects included in this volume again (including a tag which made the cover!) and wanted to share them. 
 
Creative Inspiration Magazine Issue 6


CO724004 Ornamental lace die – Bold Bouquet
CO723982 Vintage Rose Garden paper- Rose Header
CO724020 Vintage Rose Garden paper – Butterflies & Words
CO721998 Pearls Moonlight
CO721997 Pearls Pink Blush

 
CO724005 Ornamental lace die – Touch of Love
CO724019 Vintage Rose Garden paper – Florals & Time
CO721997 Pearls Pink Blush

 
CO724018 Vintage Rose Garden – Rose Borders
CO724017 Vintage Rose Garden – Butterflies & Stripes
CO723954 Sweet Accents nesting dies – Vintage Labels
CO723957 Sweet Accents nesting dies – Fancy Rectangles
CO724045 Vintage Rose Garden border die
 
 
CO724017 Vintage Rose Garden – Butterflies & Stripes
CO724046 Vintage Rose Garden papers
CO724044 Vintage Rose Garden papers
CO724041 Vintage Rose Garden papers
CO721998 Pearls Moonlight
CO721997 Pearls Pink Blush


Tuesday, 25 November 2014

Baby Girl Card - Couture Creations DT


My friend gave birth to a beautiful baby girl in late October so of course I had to make her a celebratory card! There is something precious about receiving a hand made card and often they come together quite quickly if you already have a set design in mind.


 Here is how I made my card, if you want to make something similar.
 
1/ Cut your cardstock to 6" x 8", scoring it halfway and folding to create the base.
2/ Cut a rectangle slightly smaller than 6" x 4" from CO724016. Ink the edges in a dusky pink and stick to the base cardstock.
3/ Cut a strip from CO723997 and stick in the centre of the card.
4/ Die cut the border piece CO724045 four times from white cardstock and adhere down the sides of the green strip. 
5/ Die cut the scalloped circle from CO724019.
6/ Die cut the circle from white cardstock and ink the edge with the dusky pink.
7/ Die cut the rocking horse. I used an Ultimate Crafts die but you could use the Couture Creations rocking horse  CO723518 from the Secret Treasures line if you have that. 
8/ Ink the edges of the rocking horse and cover with crackling medium. Leave this to dry for a few hours. My horse curled up during the drying stage, I put it under my embossing plates and ran it through my Big Shot a few times to flatten it out.
9/ Once dry, adhere the rocking horse to the cardstock circle with spray adhesive. Stick the circle to the scalloped circle. Place rhinestones in every second scallop and a pearl for the horses eye.
10/ Loop a ribbon as shown in the photo and stick to the card. Adhere the scalloped circle over the top using mounting foam tape.

 
Couture Creations Materials List:
CO723041 Nesting Dies, Scallop Circle
Nesting Dies, Circle
 
Ultimate Crafts Material List:
ULT157225 - La Craftina - Rocking Horse (60.4 x 49.4mm)
 

http://lozcraft.blogspot.com

Thursday, 13 November 2014

Cherish - Couture Creations DT

 I am loving the new Vintage Rose Collection papers from Couture Creations. While I'm not normally a pink/green/flowers kind of girl, they have great designs which just beg for some fussy cutting. I have used lots of fussy cut flowers on my layout today which features four generations of my family.
 

Want to create a similar layout? Here's how:
1/ Cut your paper to size. I used Green Florals at 12' x 12', CO723984 at 10' x 10', Line of Leaves at 10.25' x 3.5', Rose Header at 9' x 2.5' and one of the postcards from Carte Postale. Distress the edges of all these papers.
2/ Run the Rose Header piece through embossing folder Velvet Tea Lights.
3/ Mat your photo on cream cardstock and distress the edges.
4/ Adhere all the papers as shown in the photo, raising the embossed sheet and photo mat using foam tape or cardboard.
5/ Fussy cut a number of different flowers from Time. Adhere them around the bottom right corner of the photo mat at multiple different heights as shown below. Pop Gemstones in the centres of the flowers.


6/ Paint your chipboard and adhere as shown in the photo.
7/ Cut the Siblings die from cream cardstock. Ink the edges of the boy and adhere to the photo.
8/ Add your title and you're done!
 
 Couture Creations Materials List:
 
http://lozcraft.blogspot.com

Monday, 20 October 2014

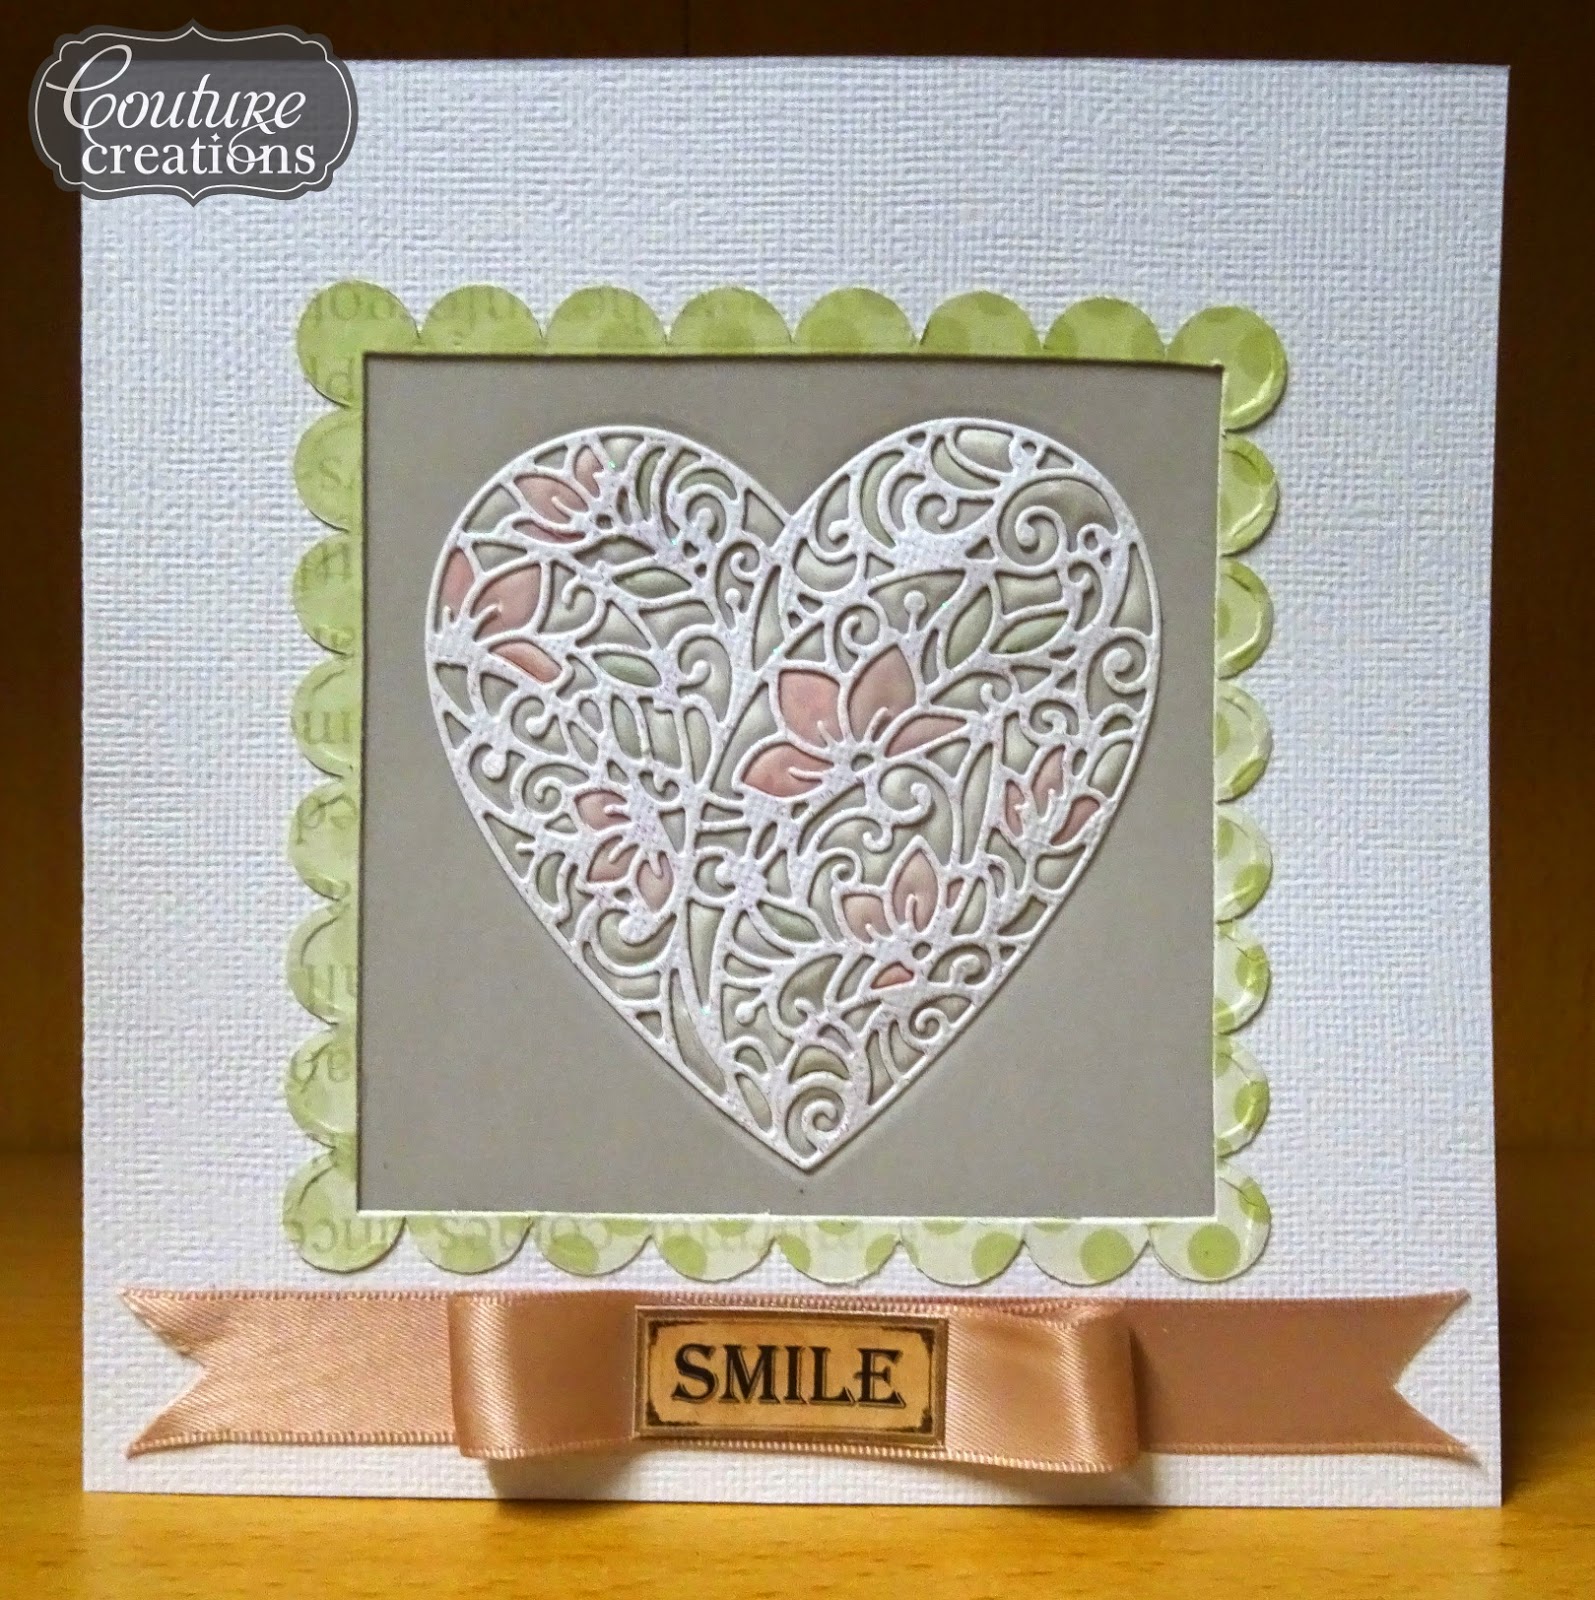
Friendship Card - Couture Creations DT

I think it's always good to try new things once in a while to help you learn new techniques or styles. With that in mind, I have a created a very girly greeting card for my second project this month with a muted colour pallet. I hope you enjoy it and are inspired to try something new yourself.
 
 
1/ Cut your cardstock to 12" x 6", scoring it halfway and folding to create the base.
2/ Cut the middle panel out of the cardstock using the largest Square nesting die, ensuring you have centred this.
3/ Use the centre square piece to cut Touch of Love from the Floral Lace collection. Because this is such a delicate design I strongly recommend you use the Quick Release paper with this and run it through your machine a couple of extra times. Most of the design will then fall away easily, use your craft knife to get those last stubborn pieces. 
4/ Use your finger to rub Crystalina Glitzin Glamour over the heart and set aside to dry.
5/ Use the largest Scallop Square nesting die to cut the border from the green spots side of a sheet of Time from the Vintage Rose Garden paper (if you want to ink your border edges, now is the time to do it). I then used the same Square nesting die to cut out the inside of this and adhere it to the cardstock. Be careful when lining it up or you wont get a single solid border piece, you can always glue the scallops on individually if this happens.
6/ Cut a piece of vellum slightly larger than the window of the card. Run this through your die-cut machine with the Floral Lace die, however add in the embossing mat to your sandwich (you may need to remove one of the tabs, depending on how your machine works) so the design is embossed into the vellum rather than cut out of it.
7/ Use watercolour pencils to colour some elements of the design on the back of the vellum. I used a wet paintbrush to lift the colour straight from the pencil and applied a couple of layers to get a nice thick coverage so you can see it from the front of the card. The picture below shows you the back of the vellum so you can see which elements I have chosen to colour.
 
 
8/ Once your watercolours are dry, adhere the vellum to the back of the window. Adhere the white die-cut to the front of the vellum, I used spray adhesive for this.
9/ Adhere ribbon to the bottom of the card as shown in the photo.
10/ Cut the 'Smile' sentiment from Butterflies & Words paper from the Vintage Rose Collection and adhere to the centre of the ribbon.


Couture Creations Materials List:
CO723998 Vintage Rose Garden 12" x 12" paper, Time
CO724020 Vintage Rose Garden 12" x 12" paper, Butterflies & Words
CO724005 Floral Lace Collection, Touch of Love
CO723042 Nesting Dies, Square
CO723043 Nesting Dies, Scallop Square
 

http://lozcraft.blogspot.com