Showing posts with label Gift. Show all posts

Sunday, 20 January 2019

You Are Strong - Romanian Woman Canvas

It has been quite a while since I've uploaded anything to this blog. I'm still creating, but most of my stuff is only being displayed on my Instagram account. I feel that not too many people are actually reading full blogs anymore. If I'm wrong, leave me a comment at the bottom and I'll start sharing more here too. 


So this canvas was created for a friend at work, who had asked for a similar piece to one I've done before with a Romanian woman to reflect her heritage. I love doing these canvas pieces and am running out of room to keep them in my craft room so was happy to make one to give away. I thought I'd whip up a quick tutorial as well while I was at it.

My top tips for mixed media work:
1. Don't fall in love with the first couple of layers - realistically you're just going to cover most of these up.
2. Ensure you have contrast. Whether that's highlights of black/white or a pop of a different colour, you need something that stands out.
3. Don't be afraid to make mistakes, you can always cover them up if you really hate the effect 


First step for me when creating any mixed media piece is to lay down the background texture. Here I've used a book page, builders tape and crackle paste through a stencil. Because I'm working on a canvas, this was already primed with gesso. If you were creating on paper it's normally a good idea to give it a coat of clear or white gesso first to minimise warping.


I covered the whole thing with three shades of red/orange acrylic paint, blending them together as I spread the paint by spraying them with water to thin them out a little. This has actually blended them a bit more than I would have liked but I wasn't going to stress about it.


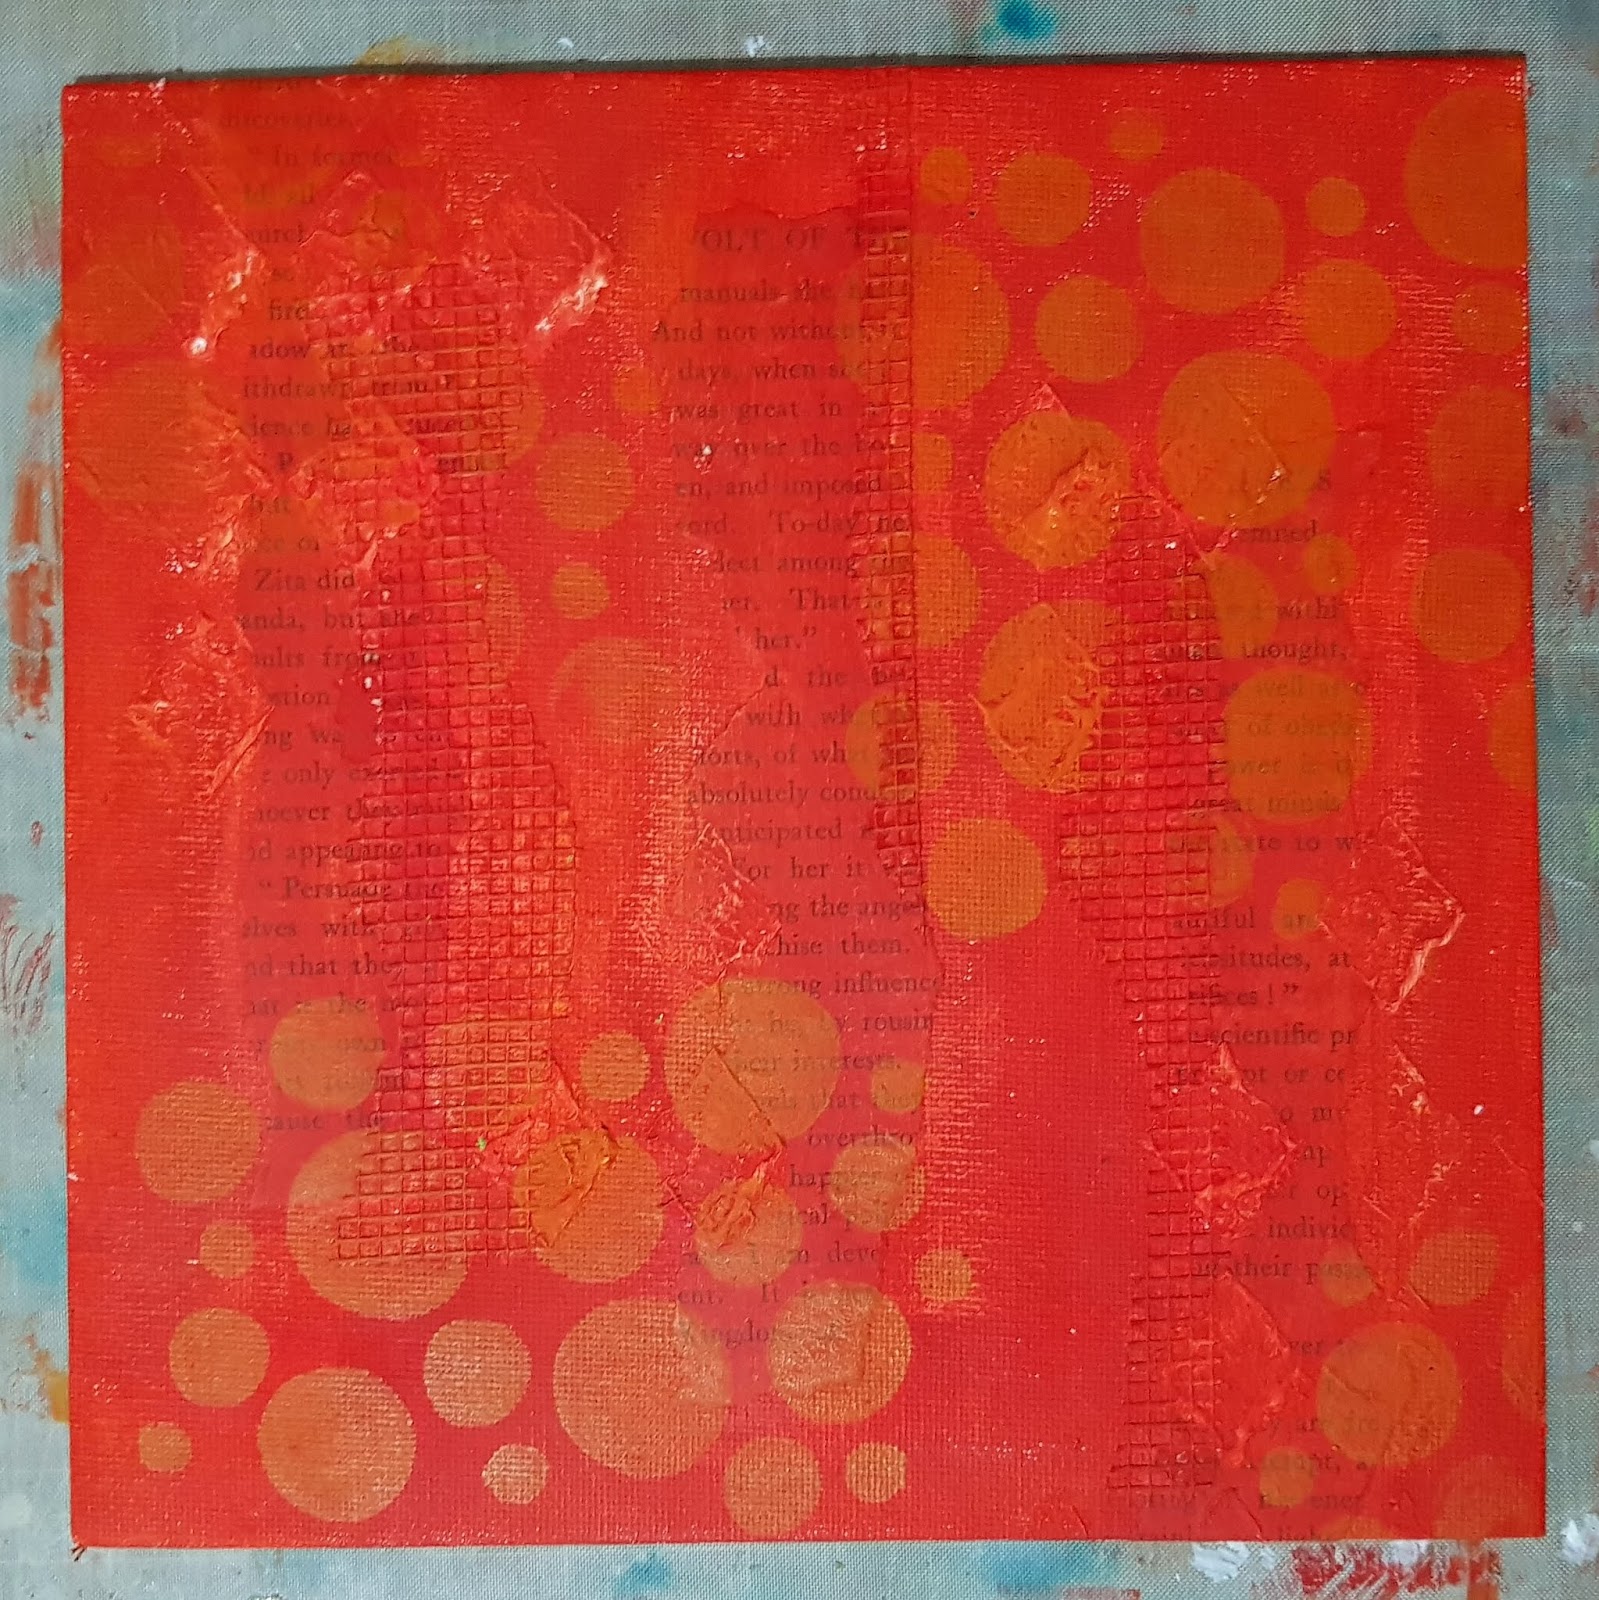
I applied some of the lightest orange acrylic paint to create circles on the background. I used a gelli plate to do this, with some ghost printing to create the lighter impressions. You could just as easily apply it directly through a stencil though.


This photo combines two steps. I drizzled some blue misting ink along the top edge of the canvas, letting it pool and drink wherever it felt like. I decided the blue didn't suit what I was going for, so went over it again with a brown ink which has a blue shimmer to it, just to tone it down and create a few more drips. 

Once that was dry, I applied the grey paint through a stencil. I wanted a really crisp design though and unfortunately my paint bled under the stencil. I just grabbed a baby wipe and whipped off all the grey paint. :)


Using the baby wipe to remove the paint gave me two lovely effects. Firstly, the grey paint stayed on the builders tape and highlighted that texture. I decided I liked the effect, so spread it around to the other areas with tape too. Whilst I was wiping the paint, it also took off the red paint from the top of the crackle paste, which made the stencil designs stand out more too so I repeated that over the whole canvas. 


I added a lot more interest to the background in this stage! I repeated the mist/ink drizzle at the bottom with a dark brown ink which I also flicked over the whole canvas, as well as some white ink. I've used white and brown pencils to highlight some of the orange circles. Lastly, I've applied some silver wax highlights to the crackle paste.


Once you're happy with the background, it's time to start building up the mid-ground. I used a paper doily, some cheesecloth and a ribbon off-cut. They were all glued down with matt gel medium.


The last step is to add your focal pieces. For me this was the Romanian woman after cutting her out and inking the edges in brown, along with the motivational stickers. I used a aquarelle pencil around the stickers to make them stand out a bit more too. Lastly, I added a couple more ribbons to the mid-ground as it was a little bit too plain otherwise. 


Hope you enjoyed the tutorial. If it inspires you to create something I'd love for you to share your project with me!

Tuesday, 6 January 2015

Salt Dough Ornaments

I couldn't celebrate Harrison's first Christmas without doing something crafty to commemorate it. I thought salt dough ornaments would be a cute idea to record his foot and hand prints. I hadn't taken into consideration just how much of a giant my little man is at the moment though, so they ended up being much larger than I had originally anticipated.
 
 
They took quite a while to dry so I had to paint them down in Melbourne using a cheap travel acrylic paint set. I gave one hand and foot print each to each set of grandparents, they loved them. I have one hand and foot print here at home which I will paint and keep for us too. I can't wait to look back at them next year and see how much he has grown. :)


Monday, 5 January 2015

Grandson Photo Frame Gift

 
Hello and welcome to 2015! I spent Christmas and New Years down in Melbourne with family, which was quite lovely as we don't get to catch up that often. I made a few hand-made Christmas presents this year and had to wait until I got back home to be able to share them.
 
My mum came to stay with us when Harrison was born last year, so we took her along to his newborn photoshoot. I wanted to give her a copy of her photo in a nice frame, but couldn't find anything I liked. I ended up buying a pretty plain black frame with white matting and creating a display piece. 
 
 
It was a lot of fun getting elements to match her shirt and building up the clusters. As you can see in the close up, there are metal charms, chipboard with crackle paint, flowers, leaves and pearls in each corner.
 

Monday, 9 December 2013

Christmas Stockings

I have certainly gone overboard with the hand-made Christmas decorations this year and the craziest part is they are all for work! This weekend I spent sewing some cute stockings for all the people who work in my 'pod' or cubicle group.


It has been quite a while since I did any significant sewing other than borders in scrapbooking layouts. I modified a pattern I found on line for these stockings and while I made a MESS of the first attempt, it was actually quite a simple process. I have received quite a few compliments from people at work about these.


Here is a close up of two of the stockings so you can see the fantastic Scrapmatts chipboard I used to embellish the MDF letters.


The colour scheme of the stockings also suits the current challenge over at one of my old Design Team blogs, The Lollipop Ladies, so I'm entering them there.


 Lastly, because Christmas is always better with glitter, here is a beer bottle I've coated in glitter to hold some fake berries. I think it's pretty cute. :)

Tuesday, 19 November 2013

Timeless Love - Scrapmatts DT

The second design team brief of November was 'Gift Giving', I chose to create a present for my Nana. The Scrapmatts painters trays make fantastic gifts or keep them for your own home decoration. This tray features photos from my Nana and Pa's wedding day and a photo of the two of them taken a couple of years ago.

 
The green vine is from one of my favourite packs so I'm a little bit sad that I have now used it all up. I also used up some bits and pieces from various class kits I have accumulated. I always used to do a Scrapmatts class whenever I went to a craft show and they always give very generous packs so you have enough chipboard to make some extra cards when you get home.


Here is a close up to show of the crackle finish of the frame and light gloss on the title pieces.

Scrapmatts pieces used: CB2020 Vines 01; CB1134 Assorted Words 01; CB1199 Scrap Words 07; CB7006 Printer's Tray 02.

Frosted Designs has their fortnightly challenge as 'Give a Gift!' so I thought I'd enter this there too.

Saturday, 18 May 2013

Suns LO and Mother's Day Present OTP - Scrapmatts DT Reveal

Reveal time for my Scrapmatts DT projects for May. Our first brief was a colour challenge and I chose the lemon/white/red combo. I just couldn't go past doing a LO about my favourite Australia Football League team with those colours. I kept the focus on the photos with a simple LO inspired by this month's sketch at Paper Stories. I'm loving using the flags as arrows on my LOs, they are a great way to draw the eye. 
 

Scrapmatts chipboard used: CB4055 Assorted Words 09; CB5103 Flags 03.
 
The sketch, which I rotated to suit my photos:


The second brief was to create an off the page project. If you check out the gallery you will see a lot of the DT has created projects using the beautiful new release Memory Cabinet but I'm saving mine as a treat to completing during my upcoming week of work in June. I decided instread to create a mini-abum for my mum. She will be moving to Indonesia to live for a year while dad works over there and when she was doing the same thing in China she used to complain about not having any photos of her children to show everyone. I thought the mini painters tray would work beautifully as a mini brag book.
 
Here is the cover:


Here is the full thing so you can see the pages too. I have kept them pretty simple as I wanted the focus to be on the photos and also wanted to keep the pages flat.


Don't forget I'm also hosting the monthly challenge over at Scrapmatts this month. I'd love to see what you can create using Scrapmatts products and stamping. It's that easy!

Monday, 18 March 2013

Cherish Painters Tray

I have had one of the beautiful Scrapmatts painter's trays in my stash for months now but back in February I woke up one morning inspired as to what I wanted to create with it. I thought it would look great teamed with this photo of my husband's maternal grandparents and done in a beach theme.
 
 
You can see in the detail shot below the little beach scene I created with some sand and raffia. It also shows the crackled paint effect on the frame as well as some more of the great Scrapmatts chipboard I've included. I have done a tutorial on the Scrapmatts blog if you want more details or to see how I made it.


Tuesday, 1 May 2012

First Wedding Anniversary

Today is my one year anniversary with my darling husband, Ben. Since the traditional first anniversary gift is paper I couldn't go past making him a mini-album to celebrate our first year of marriage. It's pretty simple in design because we had originally decided against exchanging gifts so I made this the day before our weekend away in 12 hours.

I used the Kaisercraft After Five range becuase the neutral colour scheme made it easy to match photos from the whole year. There is four chipboard tags and three cardstock tags to make the album sturdy but not too bulky. I was able to use the 6" paper pad and the journal tags to complete the whole thing. Chipboard number, mini alphas, bling, alphas and flower are also Kaisercraft. Alphas are American Crafts. Doilies by the Chip Chop Shop. Ribbons were already in my stash.


In case you're a sucker for detail and want to get an idea of every page, here are individual photos of the whole thing. Probably best to click on the photo for the larger version is you want to see the details. I really like the effect of the full page photos. How young are we in that first photo, it was taken oven 10 years ago now! The very back pages contains my thoughts for the future and a copy of our wedding vows.


To celebrate our anniversary, Ben and I spent a couple of nights at Mount Tamborine, QLD. It's only about a 30 minute drive from where we live but is very different to the Gold Coast. The Gold Coast is mainly known for it's beaches and theme parks. Tamborine Mountain is beautiful rainforests and sweeping views with a very arty focus. We spent the weekend visiting a number of different art galleries, coffee shops, wineries, breweries, cheese shops and fudge shops. We stayed at The Escarpment Retreat which was just lovely. Big four-poster bed, fireplace, double spa, you could hear so many frogs during the night (I LOVE frogs!), beautiful grounds to explore. They also have a 'home cinerma' experience which was quite enjoyable.


I wanted to share a photo of these goat sculptures from one of the cafes. They also had sheep and dogs for sale. I didn't even look at the prices for these guys though, as a palm sized version was $450!

Tuesday, 27 March 2012

Canvas Gift

I don't normally do too many OTP things but on Sunday everything just aligned: I had some left over chipboard from Scrapmatts, I had this canvas and stand left over from a year ago and I wanted to make a gift for a friend who is going through a rough time.


There are some stunning examples of mini-canvas art on the internet, I was really inspired by some of them. I have kept this one pretty simple to keep the focus on the quote which related to my friend recently telling me she was going through counselling to become the person she wants to be.

Here we have a close-up of the flowers, the dark brown ones are actually singles that I joined with a brad and scrunched up while wet with gold Glimmer Mist. I was very happy with how full they ended up looking... and happy to re-discover the gold Glimmer mist. You know you have too many supplies when you start losing track of things even when they're put away.

I also wanted to showcase these cute chipboard shapes from Scrapmatts. I'm not normally a birdcage kind of girl, but they came in the extra sprue from the class and I thought it went well with the design. The photo also shows off the ribbon I put around the edge to finish it off. I'm trying to add more of these subtle touches to my work.

Sunday, 10 January 2010

Mum's 50th Birthday Album

My Mum turns 50 today and I made her an album to celebrate the occasion. I had made an album for Dad when he turned 50 and tried the apply the things I learnt during that one to this one. Firstly, I chose the Kaisercraft Pennyroyale range and used it for almost everything to get a co-ordinated look. This was much easier than trying to piece everything together individually like I did for Dad. Of course, it would have been easier still if I'd picked a current range rather than an old one that I then had to hunt down on-line, but I'd seen the colours and decided they were perfect for mum and nothing else would do. :)
I think Mum's album looks better but I don't think I got to cover as much of her life as I did in Dad's. Since I had to rely on other people to provide the photos and send them up to me on the Gold Coast I didn't manage to get any photos of mum with her brother and sisters or with her best friend. I also would have liked some showing her doing craft as it's a big part of her life. Still, I'm pretty happy with it overall.

I included a couple of blank pages at the end for people to write birthday wishes to her when they attend herbirthday party.


Sunday, 20 December 2009

Secret Santa Photo Frame

That's right, I finally have something OTHER than an ATC to show off. My new work ran a Secret Santa with a gift limit of $10. It always confuses me why workplaces run these: you either get someone you barely know and spend $10 on something meaningless and impersonal like chocolates or get a friend and feel constructed by the small budget. Anyway, having only been at my work for 2 months I didn't really know anyone that well. I had to get a gift for a gentleman that had recently been married so decided to make a photo frame for him.

Here is the papermachie frame I bought from Spotlight:

I had just happened to pick up a wedding themed 12x12 sheet of paper the other day, originally planning on doing a LO of my aunts wedding. Decided to use that on the frame, it has golden print and a lovely shimmer to it. Stuffed up the border the first time which is why it ended up with a scallopped edge. Added some rub-ons and a chip board heart and here is the new frame:

Popped it in a gift back along with some soccer ball baubles (he plays indoor soccer), some candy canes and some chocolates. Hope he liked it.