Showing posts with label Store Class. Show all posts

Tuesday, 27 March 2018

Barefeet Welcome

Here we have my fourth project from the Workshop Wonders class I attended at The Crafty Chain. This is probably the one I free-styled the most on, possibly because it was the last class of the day and I finished a lot of it at home. 

I'm not normally a fan of these off-set border type layouts, but I think having the paint splatters go across the whole page has made it a bit more cohesive. 


In this class we used a Vaseline-smeared stamp to create a background resist which we then highlighted using Shimmer cubes. It's not a technique I'd used before so it was interesting to try something new. 


My die-cut border has some extra Scrapmatts chipboard fitted in because I have a stockpile of them. :) I loved the effect of knotting the twine from the anchor.


I also popped some white muslin behind my photo matt, just to soften the overall effect.


This is the teacher's example.


Friday, 23 March 2018

Be Fearless Canvas

The third Workshop Wonders class was one I was really looking forward to doing, as it was a canvas taught by Leanne Jago. Leanne does amazing mixed media pieces and it was great to be exposed to her techniques to build up a range of different layers and textures. Unfortunately, her expected materials hadn't arrived in time for the class so we all had to improvise a bit with substitute products.


I'm not sure Leanne would entirely approved of the fact I've added some bling to the butterflies but I couldn't help myself. I just love adding sparkle to projects and I had these left over from the first class. :) This detail shot also shows off the aquarelle pencil for all that watercolour-black effect and some great bits of crackle texture. 


I'm normally not a bit fan of using vintage images in my work but when I saw this girl in my kit with her smug smile and hand on her gun I just had to use her. I thought her attitude went perfectly with the Flutterby Designs sticker sentiments. I also killed my brand new Posca pen trying to outline the girl to make her stand out, only to decide the effect was too subtle and used white gesso instead. 


This shows the multiple layers: gesso base/crackle medium/acrylic paint/white embossing powder applied to glue through a stencil/brown ink drizzles/acrylic paint smudged on with fingers/stamping/mist splatters.


This was Leanne's sample piece. You can see that I've stuck very close to her design but gotten quite a different finished product just with some different paint colours. 


Wednesday, 21 March 2018

A Day in the Sunshine

This was class two from The Crafty Chain's Workshop Wonders event, taught by Geli Duncan. I've used photos from a trip to Tropical Fruit World I took with my sister and son in August 2017. They worked with the colour scheme of the class so well and I liked being prompted to use different photo sizes to what I would normally.  


See this beautiful blue flower below? Geli taught us how to make that from scratch using plain white foamirian. Given I already have a literal huge drawer of flowers I don't think I'll be making my own anytime soon but it's always fun to learn something new.


The beautiful due is by Couture Creations and we each got a brand new included in the class kit. The background technique was a fun one to learn as well, though as is often the case for me I didn't extend it far enough past my photos. It's made on Kaisercraft specialty embossed paper using Twinkling H20's and baby wipes to create a beautifully soft blended effect. 


Below is Geli's samply layout. I stuck with something pretty similar, just changing the composition to match the different photo sizes I had. 


Monday, 19 March 2018

Anything is Possible

I was craving some crafting time over the weekend but my new scrap room isn't set up yet. Luckily, I had signed up for the Workshop Wonders event being held at The Crafty Chain! Four classes with four different teaches over the course of a day, it also included lunch, snacks and a lolly bar.


This was the first layout, by Kelly-ann Oosterbeek. It has a LOT of fussy cutting. I tried something different for me and left more of a border around the image so I could cut faster. Having an 'edge' normally annoys me, but it worked into the background on this layout. 


The beautiful butterfly stickers are made by Kelly-ann herself. I should have picked up a couple of packets but I couldn't work out what shade I wanted. I learnt a nifty trick, that if you want the wings to stay popped up you just place a pearl/rhinestone underneath.


Looking at the layout now I almost wish I had purchased a second sheet of the wreath paper, so I could fussy cut out a few more flowers and raise them up. I'm still undecided if I will add some more to this one or not.

Anyway, below is what Kelly-ann's version looked like. You can see I really didn't move too far from the sample here. I think I was too tired after all the cutting. :)


Saturday, 27 January 2018

Blessings

Finally finished my first layout for 2018! This is actually a page from a Scrappy Chat Designs kit by Beck BT I purchased back in 2015, so it's taken me quite a while to get around to. The original plan was to complete it at a retreat, but it unfortunately arrived too late. Better late than never though. :)


This was the first time I got to play with mica flakes or gold luxe paste so it was a lot of blingy, messy fun. Plus, now I've got heaps of these two products to use in future layouts. 


These photos are some of my favourites, of my husband and our little guy from when he turned one. We really should do another family shoot since he's 3.5 now but time keeps getting away from us.


I enjoyed rearing the paper and creating all the layers behind the holes. Quite a different experience for me, working backwards rather than up the page layers. My husband's only comment was 'it's quite different to your normal stuff'. I told him there wasn't much point to buying a kit if I was just going to do the same thing I always do. 


Tuesday, 13 June 2017

Photo Op

So this layout isn't part of my Brisbane Expo classes showcase, I've just been very late in blogging this layout. A new scrapbooking store recently opened near my home (so lucky!) and they had the amazing Beck Beattie come to teach a class demonstrating how to use her Color Crush powders. I love Beck's work, enjoy her classes and have wanted to learn more about using watercolour effects on layouts so even though I had to organise a babysitters I couldn't pass this class up!


Beck had stamped the squares on the background for us and then gave us a lesson on 'layered stamping' where we got to add the script, checked and hexagon stamps ourselves to build depth. She also provided a simple but really effective colour-theory class before we picked out our colours and starting painting the background. I was originally planning on having a blue theme to the layout, but I'm so much happier with this bright red/orange/yellow layout with pops of blue for accents!


We used the Tinby Designs Color Crush powders for all the colour in this layout, so we got to learn how to paint them on like watercolours as well as sprinkle the dry powder on the page and activate it with a mister. Lastly, I splodged some yellow over the page via some scrunched up plastic.


Once I got the layout home I couldn't resist adding the blue stars, some black foam * shapes and a small title. I was also lucky enough to have my friends buy me a selection of 7 different Color Crush powders for my birthday, so now I just need to find time to play with them! :)

Monday, 27 July 2015

Love This - Beck BT class

It was a very busy weekend for me! Ben and I left Harrison with some friends and went to see Ant-Man at the movies on Friday night. Quite an enjoyable movie actually. Saturday I spent at the My2Angels scrapbooking retreat, scrapping from 10.30am until around 9pm. I somehow still didn't manage to get much done but it was bliss to have some uninterrupted scrapping time rather than having to do 30 minutes here and there around caring for Harry. Lastly, on Sunday I took part in the Color Run.
 
 
I had great plans for my time at the retreat, I was going to finish Lynda's wedding album (you know the one, it's been on my to-do list for the past three years) and then complete all these unfinished projects I have from various classes I've attended. Unfortunately, things didn't quite go as planned. I got to basics of three more of Lynda's pages but need to re-print two photos for two other pages. I need to go back over the whole album and add embellishments to the basic layouts.
 
I did however manage to finish this layout from Beck Beattie's class at the June Scrapbook Expo 2014 (yes, over a year ago!). It really didn't require much work to finish it off, I'm just so bad at pulling these projects out again if I don't finish them at the class. Anyway, it was fun the play with the textured spackle or whatever it was and I realised I got some new Gelatos in that kit, so I've added them to my collection.
 
Hope you had a great weekend too!


Sunday, 13 October 2013

So Proud - Noosa Retreat Class

Ann ran a series of additional classes at the Noosa Retreat which you could sign up for during the weekend. I only chose to do one extra class but really like the end result. The focus of this class was using different embellishments on your page so this includes metal filigree pieces, press studs, die-cuts, pearls, and irridesent medium.


Here are some close ups of all the different hot air balloons we created. Best part of this class was the fact I got to go have a massage during part of it and Ann cut out all the balloons for me! LOL The chipboard letters were part of my lucky door prize, because I forgot to bring ANY of my alpha stickers to the retreat. Certainly added another level of challenge to the weekend. :)


Friday, 11 October 2013

Hens Party - Retreat Class

There is always a class included in the cost of the Noosa Retreat and this year we had the lovely Sue Smyth come to teach us. It was a very intense class with lots of instructions to follow. I have used photos from my hens party back in 2011 which I hadn't gotten around to scrapping yet. We did a burlesque dancing class followed by a life drawing session, hence the costumes and well-muscled gentleman. If anyone is looking for a venue for a hens party around Melbourne I can certainly recommend Hens Love Art in St Kilda. In fact, after checking out their website it looks like they have upgraded their venue since I attended so it would be even better now!
 

 Most of the other ladies at the retreat had never used gesso or templates so this class just blew their mind. LOL I think the layout looks a little bit too busy for my tastes and I'm not really convinced the colours work together but I did learn a couple of new techniques. The colouring technique used on the chipboard gate piece looks amazing and was repeated on a couple of layouts through out the retreat by some of the other participants. We also learned how to make the flowers using die-cuts. There was a lot of painting, misting, scrunching and stamen building involved but they do look pretty incredible.


Saturday, 31 August 2013

Sweet - PaperStories Class

So now that I have finished with my all Gold Coast Show entries I had some time this weekend to work on some of the many outstanding projects I have in my craft room. The main project is to actually re-organised the craft room but that isn't anywhere near as fun as creating new projects. Back in June I signed up for an Collage Layering online class at PaperStories, which is owned by the lovely and talented Georgia Heald. The kit comes with materials and instructions to create two LO's, I have only made the first one so far.


I really liked playing with the paper strips, then gessoing, stamping, misting and washi taping the background. Isn't that sunflower coloured mist just divine? I like the effect of the gesso over the paper to blend it all together so I might try that again on another LO.

Tuesday, 25 June 2013

Family Fun - Expo Class LO

One of my goals for this year was to take more classes, so it was an easy decision for me to attend the Brisbane Scrapbook and Papercraft Expo this year and complete some classes. I only had one day free though, so trying to pick three classes out of the 30 available was much more difficult. Sometimes I pick classes because I love the look of the finished LO but other times I pick a LO because I want to learn a new technique. This LO was one of those choices.
 
 
I got to play with texture paste, embossing folders and die cuts. While they are all things I have used before I did pick up a couple of new tricks, plus the folders and die cutting plates were included in the class kits so I got to pick up some new supplies as well.

 
I wasn't really 100% with the LO when I got it home, however this weekend I sat down a had a play with it to add a couple more touches to it and I'm happy with the result. You can see in the detail shots I added a metal filigree piece which I trimmed into three pieces. I also stitched around the edge, doodled around the title and added some journalling to the bottom.

Wednesday, 12 June 2013

Fobwatch Scrapmatts LO - Angella Peardon Class

The first class I took at the Brisbane Scrapbook and Papercraft Expo this year was 'A Day to Remember' by Angella Peardon. Angela is the design team co-ordinator at Scrapmatts and does the most amazing designs so this was an easy class to choose. I also really enjoy doing Scrapmatts classes because Sofie makes sure you can complete them in the class time, which is great for me because if I have to take it home and finish it chances are it will sit around for ages. :) All I had to do was add the edge flourishes to the back when I got home as it now extends past 12" x 12".
 
 
This is totally not my normal style but it's always good to get out of your comfort zone and try something new. This was actually the first time I had used a hot glue gun and I ended up purchasing a mini one at the expo afterwards. I also learnt how to make some cool rustic leaves. Now I just need to find somewhere to display this piece.
 
 
Here is a close up of the embellishment clusters, just because I love the look of them. I have an extra piece of the fob watch design so I'll show more details from that when I create my layout.
 
Scrapmatts chipboard used: CB8007 Layered Fob Watch 01; CB4063 Leaf Spray 13; CB1204 Ribbon Banners 01; CB1189 Scrapwords 01; CB1194 Sewing 02.

Wednesday, 31 October 2012

She Is Beautiful

My sister HATES having her photo taken however she loves me enough to put up with it. The photographer got some amazing candid shots of her for my wedding and I've been wanting to scrap them for ages. My husband went to a weekend basketball tournament 4 hours drive away at the start of October so I booked into a class at my local scrapbooking store to keep myself busy. I ended up being the only person taking the class as one of the other ladies cancelled last minute and the other just didn't even turn up.

Here is what the LO looked like at the end of the class. I thought it was nice and good to do something a bit different to my usual style but it just didn't really pop for me.
 
 
I've always thought of classes as more of a good starting point for a LO than something that needs to be followed exactly. I've been in some classes and the other participants will be requesting the exact measurements for everything in terms of millimeters. I don't want my page to look exactly like 10 other people's, I want it to look like mine! So, I brought the pages home and had a bit of a play around and ended up with this:
 
 
You can see that I changed the left and right pages around because I prefer to have my central elements framed in a double LO. The 'beautiful' title was part of the class, I just hadn't stuck it down before I left the store. 

 
Here is my left page. I added the butterfly and pearl swirl, as well as some sentiment stickers to the photos and added my journalling. I'm laughing so hard in the first photo at something my sister had said. She really helped my stay relaxed and happy during the preparations, the perfect bridesmaid!

 
Here is my right page. I added an extra butterfly in the top right, the sentiment and title stickers and the pearls to highlight that the title relates to my sister.
 
The challenge for The Lollipop Ladies this fortnight is inspired by aniseed rings with an added challenge of black and white, so I'm also using this LO as my DT submission this week. I'd love to see what you can create with this inspiration.


Guest DT spots are able to be won each fortnight
and our sponsor this fortnight is: Annabelle Stamps *

$10 Voucher (thanks to Andrea).


Sunday, 14 October 2012

I'm back from the retreat!

I am back from the Noosaville scrapbooking retreat organised by Queensland Scrapbooking Retreats. It was fantastic! The organiser, Ann, was wonderfully welcoming and it seems like she gets a pretty regular bunch to attend her retreats so there was a very friendly atmosphere. I created 7 layouts during the three days but I'll spread the posts out over the coming week.
 
Saturday morning we spent doing a class with Cathy Cafun. Cathy was a wonderfully patient teacher and we all learnt so many new techniques during the class. We got to use some lovely Graphic 45 papers, which I normally find too fussy for my style of scrapping so it was great to try something new. There is a lot of depth and texture to this LO and I really like all the gears.
 
 
There were also instructions to make this matching card. I still need to add a sentiment but thought I would leave that until I have a reason to use the card.

 
On Saturday night we had a '70's disco themed night. There are a couple of group photos which I'm waiting to have emailed though but until then here is one of me and my room-mate Chantelle.


Saturday, 30 June 2012

Flower Sampler Frame/Class

Firstly, I've noticed I have a few new watchers so hello to you! Please feel free to leave me a comment and let me know who you are, I'd love to pop by your blog for a visit.

My friend, Amanda, invited me to attend a class at Kaisercraft Robina today. It was an epic day, scheduled to run from 9.30 to 2pm with breaks for morning tea and lunch. We ended up crafting from 9.30 to 2.30 with only a break for morning tea. Amanda and I were SO hungry by the end of it but I think it was worth it.

The class was described as a flower frame which would teach you different techniques for flower making. We didn't actually know what the finished product would look like but it sounded like fun.
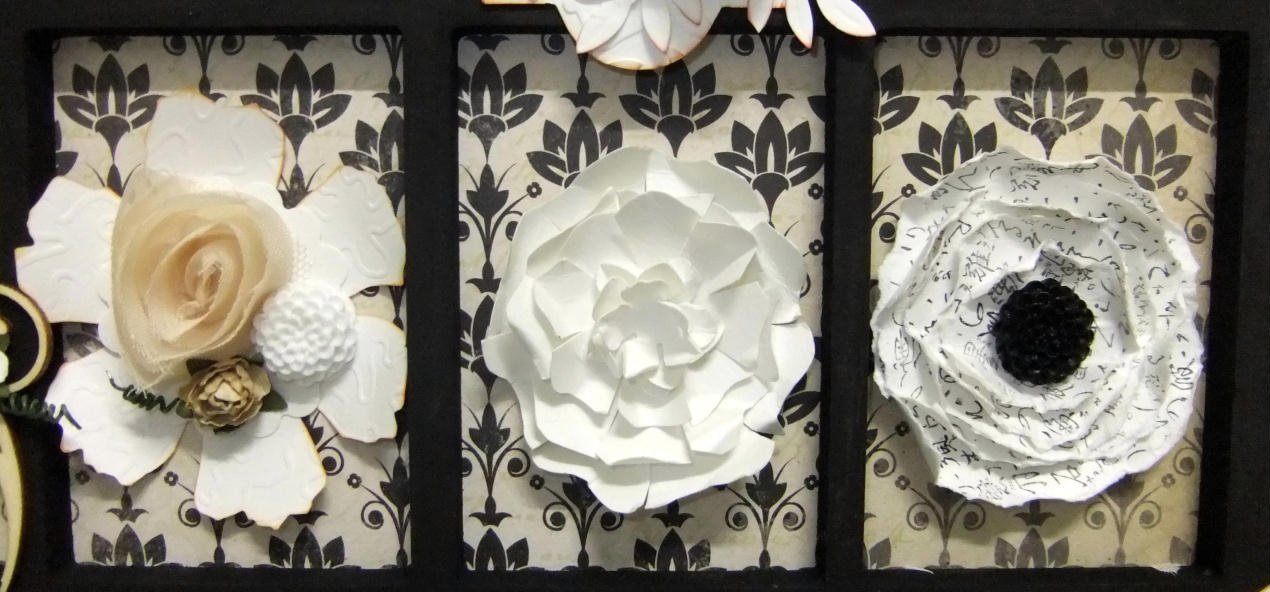
Turns out the class involved creating a sampler with different flower types in each window of the Kaisercraft 12 card holder frame.


I already knew a lot of these techniques but hadn't actually tried to create some of them so I think it was worthwhile attending. The details were a bit hard to capture given all the petals are white, the background paper is actually a nice light brown to have the flowers pop a bit more. Here is an overview of the flowers and techniques.


First row: (1) Basic crumpled petals flower (not shown in close-up). I've made these heaps of times, though I prefer to spray them with water and scrunch while wet so they hold their shape a bit better. (2) Tim Holtz die-cut with self-embossing and brad. We used a stylus to self-emboss patterns into the petals before layering them. It was handing the see the different looks that could be created depending on which way you bent the petals. (3) Hand-cut rosette and display. I'd seen techniques of how to do this one but hadn't been game to try it myself before this class. Whilst they are quite fiddly, especially waiting for the glue to dry, I think the end result is quite good and I might be tempted to try this one again. (4) Punched circle petals. Another technique I knew but hadn't tried, I think this would look more effective with inked edges or double-sided paper. I had trouble getting the right amount of overlap so it formed a complete circle.


Second row: (1) Florish and mini blooms (not shown in close up). This was just to show how to create trailing vines which I learnt a few months ago and have used on a number of recent LOs. (2) Product sampler. I think this one was just to show-off the Kaisercraft mini-blooms, resin flowers and fabric roses. :) I've been tossing up buying some resin flowers and might go back to get some, I already love the other two products. (3) Scrunched hand-cut petals. We cut three concentric circles, made small cuts to create eight petals and then scrunched them, finished off with three small flowers in the centre. I quite like this effect and it is very easy to create, perfect for creating larger flowers I think. (4) Stamped and shaped. We stamped an Asian script onto five pieces of cardstock, tore them into concentric circles and then shaped the petals around the resin flower centrepiece. Another very easy way to create a flower to perfectly match a LO.


Third row: (1) Organza petals. I love organza/satin flowers however I've never made any of my own. We alternated organza and die-cuts on this flower. I struggled to get a nice shape with my first try which was the biggest piece at the back but I think I got better so I might try making my own in future rather than buying them. (2) Pleated rosette. I knew the theory behind this and had even tried making my own of these but it had failed miserably the first time so I'm very pleased with how this one turned out! (3) Gathered lace. A very simple technique that I once again knew but had never bothered to actually try out. It was much easier and quicker than I had expected and I have heaps of lace at home so I might be making more of these too. (4) Florish and die-cut rossettes (not shown in close up). The teacher wanted us to see the different between die-cut rosettes and hand-cut ones. I don't think there is much difference in the end result so I'll be happy to continue to hand-cut mine if I make future ones rather than fork out the money for a die.

Congratulations if you made it all the way to the end! Thanks for stopping by. :)