Thursday, 31 July 2014

Sweetheart mini canvas series - Couture Creations and Imaginarium Designs Blog Hop

#couturecreationsaus  #imaginariumdesigns


Welcome to Day 4 of the Couture Creations & Imaginarium Designs Blog Hop!  

We’re so excited to team up with Imaginarium Designs  sharing inspiring projects created with both our products with you this week. What could be more perfect than our Embossing Folders and Dies and Imaginarium Designs  gorgeous Chipboard designs.
Each day this week we will feature our Design Team projects and over on the Imaginarium Designs Blog they will also feature their Design Team projects all created using Couture Creations and Imaginarium Designs products. So loads of inspiring projects for you to help get your creative juices flowing.
We will link to the tutorials on each Design Team members blogs, please show all our designers some love and leave a comment on their blog.
 
We’ll be giving away Two $100 prize packages filled with Couture Creations & Imaginarium Designs goodness at the end of the week, so be sure to play along and check back on both Imaginarium Designs and Couture Creations blogs Monday 4th August 2014 to see if you’re one of 
the lucky winners!
 
 Here are the different ways you can play along with us –
 
Like Couture Creations on Facebook 
Share this blog post on your Facebook wall and tell us you did on our Facebook page
 Follow our Couture Creations Blog 
 Leave a comment here on our blog and on our Facebook page
 Follow Couture Creations on Pinterest
Follow Couture Creations on Instagram
 
 
Hop over to the Imaginarium Designs Blog and see what their Design Team has created using
their Chipboard and our Couture Creations products! They also have a  giveaway, so what are you waiting for – hop over!  Oh and don't forget to follow our Design Team Blogs.
 
The ID ladies posting today are: Natalie May, Amy, Chito. Patricia is also posting today from the Couture Creations website along with me. 
 
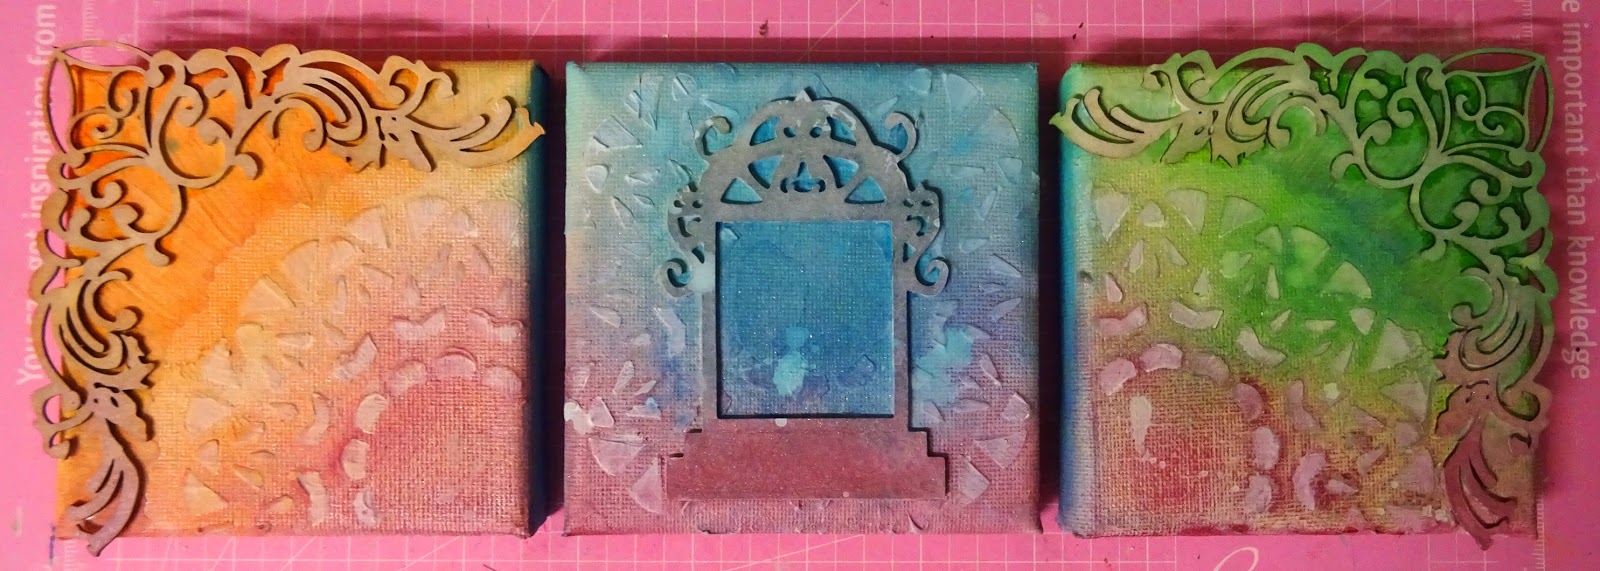
Finally after all the administrative stuff is out of the way, welcome to my post for the combined Couture Creations and Imaginarium Designs blog hop! I have created this three piece mini-canvas series.  
 

So, without further ado let's get on to seeing how you can create a mini canvas series just like this one. I wanted to create some texture in the background of each canvas and decided to create my own stencil using the Moulin Rouge die from The Treasures range of ornamental lace dies. Because I cut this out of an acrylic sheet, I made my sandwich up using cutting plate, die, acrylic, metal plate, cutting plate. The metal plate helps get a really tight sandwich and can be used when cutting acrylic sheets, fabric, light chipboard etc.


Once you have your stencil, place it on each canvas and apply texture paste over the top. I put the stencil in the centre for my centre canvas and slightly off-centre for each of the side pieces. Let the texture paste dry before moving on to the next step.

 
I chose to use the beautiful Embellishment 1 Corner pack from Imaginarium Designs on each of the edge canvases. The feature of the middle canvas is a Light Box Frame die-cut from The Metricon range. I have cut two of these from an old cereal box and glued these together to become the same thickness as the chipboard. Glue these to the canvases using a strong adhesive. Cover all three canvases (including the chipboard/cardboard) in gesso and leave to dry. 

 
Use your favourite colours of mist to add some colour to the canvases. I sprayed mine while they were close together to give a more cohesive look with the pink along the bottom. Don't forget to paint the edges of the canvas as well. I found the chipboard didn't absorb the colour as well as the rest of the canvas so I painted more colour directly onto those pieces. Dry brush some gesso over the canvas to highlight the stencilling work we did at the start.

 
Add a photo to the centre of the Light Box die. Embellish to your heart's content! I used lots of Glitzin’ Glamour and Gemstones for bling, along with ribbons, flowers and other bits and pieces.
 

Couture Creations Materials List:
CO721990 Gemstones 100pc Vintage Gold
CO721992 Gemstones 100pc Blue Iceberg
CO721991 Gemstones 100pc Green Envy
CO721980 Glitzin Glamour Glitter Glue Rainbow
 
http://lozcraft.blogspot.com

If you're new to my blog, I've also got some giveaways going on at the moment. Please check them out too if you're interested. All you need to do is leave me a comment on the relevant post.


Kaisercraft Paper pack


Rubber stamp packs.
 

Friday, 25 July 2014

Couture Creations Creative Inspiration Issue 4

Couture Creations produces a small magazine to advertise their new releases every couple of months. Because they take a few months to prep and print, Issue 4 is the first one the current design team appears in. You should be able to find a free copy at your local scrapbook store or you can click the image below and see the online version.
 
http://issuu.com/artdecocreations/docs/coinsp4
 
I have a couple of projects included in this issue, so thought I'd post them all here to share with you.
 
 
Go-karting: uses the gears die-cut and barbed wire embossing folder for the border strips. The chipboard cogs are silver embossed Scrapmatts pieces.

 
Work Party: A OLD photo of me with my dad and siblings. This uses a decorative doily die and the siblings die. Snuck a Scrapmatts chipboard arrow on to this piece.


Two card newborn set: Used the light box and siblings die cuts, plus the small dots embossing folder to create this set.

 
Steampunk card: This one was really outside my normal style but I ended up loving it. Again using the gears die-cut, I've also used the Roman Set die cut. Charms and chipboard by Scrapmatts again. 
 

Thursday, 24 July 2014

Classy & Fabulous

I have started my maternity leave this week and am hoping to use the extra time to get ahead in some of my DT commitments. Before I sat down to work on those though I wanted to create a layout for a challenge, so turned to my trusty favourite Once Upon A... Sketch. The journaling prompt for this month was to focus on a number. I have used photos showing my growing belly during different weeks of pregnancy, my journaling in included in the yellow pull-out tab to the left of the photos.
 
 
The title is meant as a joke, it was one of the journal tabs in the paper range and it made me laugh as anyone who knows me would agree I am neither classy or fabulous. :) I have used the Butterfly Kisses range from Kaisercraft as I like the bright colours and thought I should squeeze in one last girly layout about me before they all become focused on my coming son.
 
 
Lots of bling and beads added to this layout, plus a little bit of black to grunge it up a bit. Can't get too carried away with the girlyness. :) Here is the sketch I worked from:
 
 
There has been quite a bit of growth since the week 21 pictures was taken. I reached 36 weeks yesterday and this is what I now look like!


Anyway, I continue on my missing to clean and purge my craft room, so have decided to give away the remains of my Butterfly Kisses collection. I think I won this collection at some stage and while this is the second layout I have created with it it's always a struggle for me to work with. Rather than hold on to it I'd love to see it go to someone who will use it. International postage costs restricts this giveaway to Australia residents only. Again, if you're interested just leave me a comment and I'll draw a winner in the coming weeks. Don't forget I'm also giving away some stamps to a good home.

 
Included in the pack:
Collectables (die-cut shapes) - partially used
Rub ons - as new
Layered chipboard - partially used
6.5" Paper pad - partially used (I think I've used maybe three sheets of the 24 included, all 12 of the speciality papers and 4 sheets of die cuts are still there too)
4 sheets of double sided 12" paper - partially used
3 die-cut speciality 12" single sided papers - as new
1 speciality spot varnish 12" single sided paper - as new
1 x 12" sticker sheet - as new
 

Wednesday, 23 July 2014

Craft Room Clean Up = Stamp Giveaway

So while I'm going through this 'nesting' phase I thought it might be a good idea to tidy up my craft room too (plus, there is that much junk on the floor that I actually can't walk around the room!). The good news is I also appear to be in a bit of a purging mood, so have decided to try to be ruthless and discard those supplies I'm simply no longer using.
 
I'm a hoarder, so this is a big step for me and I'm not sure how successful I will be but it's always worth a try. Hopefully this will help me keep my room neater and allow me to use more of the supplies I own as they wont be lost amongst all the rest of the 'stuff' I have.
 
I have accumulated a whole pile of wood block mounted stamps over the years, even though I rarely use stamps at all and certainly not wood block ones any more. I have listed these for sale in bulk lots over on ebay, so if you are looking for a bargain please check out my listings (postage within Australia only).
 
I also have two packs of unmounted rubber stamps which are free to a good home! Just leave me a comment telling me which pack you would prefer (or both if you don't mind either) and I'll draw two winners in the coming weeks. Because I can send these as letters they are open to International visitors too.


Keep an eye out for future posts like this, who knows what I may decide to throw out tomorrow!


Tuesday, 22 July 2014

Christmas in July - Couture Creations DT

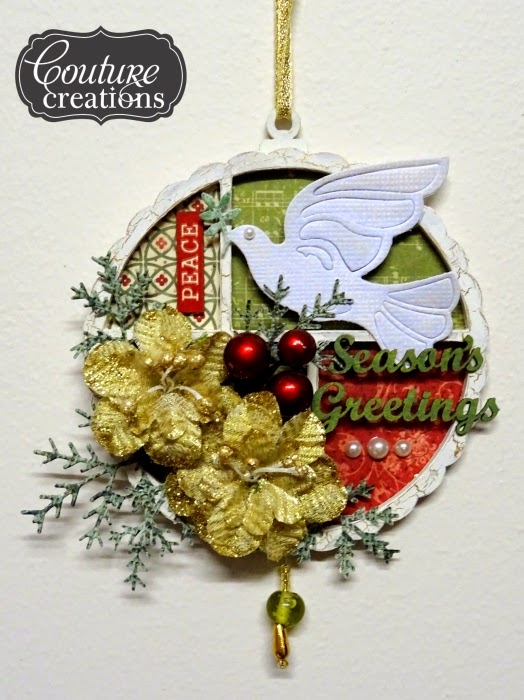
 Couture Creations is showcasing their beautiful range of Christmas themed die-cuts and embossing folders in a special Christmas in July serious of projects. I love creating Christmas scrapbooking items and chose to go with a tree ornament/painters tray as my contribution.
 
 
This is actually a really easy project to create. Start by preparing your painters tray. I have used CB3005 Mini Tray Round 01 from Scrapmatts as my base. I painted mine gold initially, then applied a layer of crackle medium and then white acrylic paint over the top so you can only see the gold in the crackles. This takes a while as each layer needs to dry thoroughly between applications but it creates a lovely subtle effect.
 
Select the patterned paper you want to use and adhere this to the different sections as needed.
 
If you want to have a dangly charm at the bottom like I have, punch the hole now and thread it through before you adhere the frame to the base.

 
Cut your relevant die-cut decorations. I have used the largest dove (this comes in a three pack) and the Pine Needles from the Merry Little Christmas Collection. Use a stamp pad to colour the vine in the dove's mouth. Adhere your die cuts to the tray and them embellish with chipboard and flowers. I have also use some Gemstones as accents and for the dove's eye. I have thrown in some more Scrapmatts chipboard in my decorations (CB1058 Words 11 Season's Greetings and CB1212 Scrap Words 14) which I have inked up in the desired colour; as well as some Manor House Creations flowers and berries from a $2 store sprig.

 
Couture Creations Materials List:
CO721996 Gemstones Crystal
CO723780 3D Foam Dots
 
http://lozcraft.blogspot.com

I was inspired by the great sketch over at Just Add Ink with this project, it suits the painter's tray perfectly.

Thursday, 17 July 2014

Joining the Shadow Box Fun - Scrapmatts DT

When I was first sent two of the new Shadow Box kits in my design team pack I thought I would never use them, and that doesn't happen very often to me with Scrapmatts products! I just couldn't get my head around how I would want to use them or what to include inside the box. However, then I saw the beautiful display some of the other design team girls had created for the Brisbane Expo and suddenly I couldn't wait to get home and start playing with my own. A lot of the ladies have already shared their shadow box designs on this blog, so hopefully they have inspired you as well.


I was given some lovely beaded good luck charms on the day of my wedding from my new cousin-in-law and grandmother-in-law. I kept them because I knew I wanted to scrap them eventually but their bulkiness had always been a problem for me in the past. This made them perfect to use in the shadow box and they will up the feature space so well. I have looped their ribbons around the back and made a little pouch/envelope for their attached cards to be stored in as well.


The front is decorated with a couple of extra Scrapmatts pieces and some flowers/bling. The filigree pieces at the top come in the set with the frame, they have been inked and then had a light layer of gesso applied over the top to match the colour of the inner mat in the shadow box. The Scrapword has just had some liquid pearls brushed over it to match the colour of the pearls in the good luck charms.
 
Scrapmatts used: Shadow Box 1B16; Ornate Frames 22 CB1220; Scrap Words 08; CB1200.
 
 
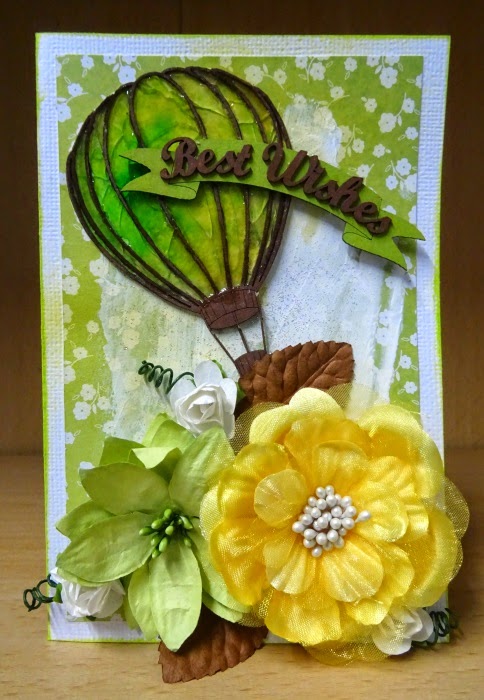
My second project for you today is a birthday card for my Nana, who turns 76 next Wednesday. I loved these hot air balloon chipboard designs as soon as they were released and had to get a set even though they don't match my normal style of scrapping. They came in handy on this card though. I have adhered some cardstock behind the chipboard, sprayed it with two colours of mists and them applied two layers of dimensional magic over the top. I hadn't expected the cracked effect but when I saw it the next morning I decided I quite liked the end result.
 
Scrapmatts used: Ribbon Banners 01 CB1204; Hot Air Balloons 01 CB5035; Words 26 CB1121.
 
Thanks for checking out my projects, I hope they have inspired you. Don't forget to share your Scrapmatts projects with us, either on Facebook or at the Ning gallery.

Monday, 14 July 2014

Get To Know Me Blog Hop

You might have already come across this new type of blog hop, as it seems to be spreading like wildfire. It is a blog hop that is not affiliated with a scrap store, or scrap company etc. It's a blog hop to share a little more about yourself, introduce your readers/followers to some scrappy lovelies that they may not already know and it's all about having fun. Tina Connelly invited me to be part.
 
Tina is a new scrapbooking buddy I have made since joining the Couture Creations design team. She is a lovely, friendly person who creates such wonderfully detailed and layered pages. I got to take one of her classes at the Scrapbook Expo in June and had a great time.  If you want to check out her blog hop post, it's here.  
 
So, moving on to the 'get to know you' part of the blog hop. It looks like some people have changed the questions around so they might be different depending on who they are following on from. I've taken questions from a lot of different people who have taken part in this hop.
  
1. What am I working on?
I'm meant to have been working on my Scrapmatts DT projects over the past four days however I ended up doing baby-related things instead so I'll have to whip them up tomorrow night now, which is a bit last minute given I need to have them ready to post on the 16th! I'm definitely a last minute scrapper, though I'm hoping to get ahead during my coming start of maternity leave from the 18th. I have also been taking part in the D-lish Scraps cybercrop to celebrate their 5th birthday. This was another thing I wanted to work on more over the last four days but didn't get around to. I can share a sneak peak from my Couture Creations Christmas in July project which will be shown on my blog in the next fortnight. 


2. How does my work differ from others of its genre?
Umm...I don't know. Lots of the scrapbookers I admire have quite distinctive styles, whether it's the way they use paint or layer their paper or even just a similar composition on most of their layouts. I don't think I've really developed this myself, I tend to jump around a lot depending on what challenge I'm working towards.
 
3. Why do I create what I do?
I like to have an excuse to get messy. Scrapbooking for me is about getting a chance to play with the paints/mists/glues and let loose. I also like that it gives me a reason to go through all my old photos and remember different moments spent with my family and friends. I wish I was better at recording journaling in my layouts though, as the memories get pretty fussy after time.

My 'Feed the Birds' layout is a perfect example of this. There's paint on the shipboard and flicked over the page. The photo is of my and my family on holiday from way back in 1989. I think it's a great photo and I would hate for it to remain stashed away in an album and never looked at again if I hadn't scrapped it.


4. How does your creating process work?
I normally need a reason to scrap, whether that is a challenge or a design team commitment. It's very rare I will create 'just because'. I like that this gives me a jumping off point, sometimes it's only a little jump and sometimes I can take quite a broad interpretation of the challenge but I need that prompt to start me off. Once I have that it's normally a matter of choosing my photo(s) to suit, picking papers to match the photos, messing it all up with wet mediums and then embellishing to finish it off.

5.  How long does it take to create a project?
How long is a piece of string? I used to be a quick scrapper, sitting down to create a layout and not getting up again until the layout was finished, normally 1-2 hours later. Then I started playing with mists and paints, so you need to walk away while they dry (I didn't have a heat gun) and now I end up working on most projects over a number of days. I think this is partially why I'm less productive recently. Having said that though, I'm also a very impatient scrapper and after getting the bare bones of a layout sorted I will quickly move to just sticking things down, often meaning I need to peel things up again later when I change my mind. :P

6. How do I become inspired and stay inspired?
The internet definitely helps me to stay inspired. Whether it's looking at the blogs of so many of the wonderful scrappers I follow, or popping into a forum for some feedback, or taking part in a challenge, or even just scraplifting something from Pinterest. Conversely though, I think the internet is also the thing that takes up the most of my time away from scrapping as I know I am guilty of wasting hours sitting on the computer when I should be cleaning the house or creating.
 
From here I'm meant to link you up with three other fantastic artists who inspire me and they would schedule their post for next week. Unfortunately, no one I asked was able to participate so this part of the hop ends with me. :( If you want to take part and follow on just leave me a comment and I'll give you a shout out here.

In the mean time though I can't leave you without any inspiration, so here are a few of my favourite artists.


Linda Eggleton (Lou's World) - Linda is such a creative scrapper, I always turn to her blog when I need more inspiration. I love the way she uses stencils and layers her paper. She also seems like a lovely lady from the interactions I've had with her. Linda has already taken part in the blog hop, her post is here.

Natalie Elphinstone (One Scrappy Doctor) - Natalie has a very different style of scrapping to me but I love how much journaling she includes in her layouts. She is very honest, both in her journaling and on her blog. She also has two of the most adorable girls who feature in most of her layouts.

Annette (Annette's Art Alchemy) - Annette does not consider herself a scrapbooker, despite creating some amazing paper creations. She is definitely an amazing jewellery maker, specialising in steampunk designs. I'm lucky enough to have one of her wonderful rings which she sent me as a present.

Monday, 7 July 2014

Need for Speed - Couture Creations DT


Looking for an easy way to make a pretty doily die work on a grungy boy layout? Trying turning it into a gear like I did on this layout.
 
I cut a Moulin Rouge doily from The Treasures range out of black cardstock, then used my craft knife to remove some extra parts of the pattern to give me more of a 'gear' shape. I also cut a Cog Border from The Metricon range. Both of these die cuts were them heat embossed, first with gold powder and then with brown powder, to give them an aged metallic look. Apply the same process to your chipboard title. 

 
The background was created by trimming down a sheet of white cardstock and roughing up the edges with my scissors before applying this to a sheet of black cardstock. Use the reverse of your new gear die cut as a stencil and spray a metallic mist in opposite corners.
 
 
Grunge up the background by applying strips of scrap paper and some builders tape. Stamp over this randomly with black and brown pattern stamps. Tie is all together by swiping gesso over the background randomly. Lastly, flick some watered down black paint over the background for splatters.

 
 Silhouette cut one of your photos and then arrange the photos and gears together with the title. I have used a piece from Imaginarium Designs which suited my photos perfectly. Don't forget to include some journaling to preserve the memory.
 
 
Couture Creations Materials List:
CO723739 The Metricon, Cog Border
CO721956 Stainless Steal Scissors
CO721986 Handheld Essentials Craft Knife, Piercing Tool and Scoring Tool

http://lozcraft.blogspot.com
 

Sunday, 6 July 2014

Strike a Pose

After the very traditional non-messy layout I created yesterday I had to go a different style this time around and pulled out the mists, stamps, gesso and stencils. This layout is also for D-lish Scraps 5th birthday cybercrop. Photos are proofs from a photoshoot Ben and I did almost 10 years ago, I've had them sitting around for that whole time without scrapping them however recently re-discovered them.
 
 
Challenge #2 is a sketch challenge, which I always enjoy doing. Like always, I have stuck very close to the original design of the sketch. I love getting to see all the different interpretations of the same sketch, some of the entries are just stunning.
 
 
Once again, I have utilised an adorable D-lish Scrap flair in this design, along with some wood veneer, buttons, threads and one of the great new Scrapmatts chipboard pieces.


Saturday, 5 July 2014

Cufflinks

D-lish Scraps is having a 5th birthday cybercrop weekend long celebration and I was inspired to take part. It felt so good to be creating something that wasn't for a design team. It was a bit odd not to pull out the paints or mists for the background though.
 
 
Challenge #1 was a scraplift challenge. It has been quite a long time since I've done a scraplift and it really helped the layout come together quite quickly. Tarrah used a photo of her groom's shoes, I have chosen to use a photo of my hasband's cufflinks on our wedding day. These cufflinks were loaned to him from his grandfather who wore them on his wedding day. I have also kept the layers and overall placement of many of the items from Tarrah's layout.
 
 
I recently received a shipment of wonderful D-lish Scraps goodies and have used one of the flairs on this LO.