Tuesday, 31 December 2013

Christmas Celebrations

I hope everyone has had a very happy Christmas and is gearing up for a great New Year. I just thought I'd share some of the highlights from my celebrations.

We started with a Christmas Eve celebration at my sister's house. This started out a few years ago as simple waffle preparation for the Christmas breakfast but has now evolved into a celebration of its own right. Kirby cooked up delicious nachos with marinated chicken and home made salsa. We then had a Christmas Eve walk, another thing that has become a family tradition. 


The following morning we all gathered at my sister's house for a Christmas breakfast. This is a fairly recent tradition which came about as mum and dad wanted some time with just the immediate family before we all split up to spend the day with our partner's families. It's always a breakfast of waffles, berries, ice cream and bacon. A great start to a very healthy day. :)


Christmas lunch is spent with my husband's family at his family home. They always put on a big European style spread with 2-4 different meats and a variety of side dishes. Helen sets an amazing table every year, with almost every decoration having a special meaning. It was a smaller gathering this year, as Helen's brother and his family didn't come so we only had 14 people.


We finished the day by heading around to my aunt and uncle's house for a casual dinner. Just a bunch of different salads and a small tray of meats to round out a very full day. It's a rule at this dinner that you're not allowed to eat unless you are wearing your Christmas hat, a rule Ben took as a joke his first Christmas with me until he was turned on by the whole family. :)


Lastly, we always spend Boxing Day at my aunt and uncle on my Dad's side. It is a terrific relaxed affair. We start with a BBQ, play a fiercely competitive tournament of bocce (I came second this year) and then eat dessert while watching the Boxing Day test on TV. At least one person will have a nap during this time, almost always me!


Best wishes to you all for the new year. Is anyone coming up with resolutions this year? I think mine will be to finally organise my scrap room and create more layouts this year. I only did 39 in 2013!

Thursday, 19 December 2013

Escape - Scrapmatts DT

I really enjoyed doing Georgia Heald's online class a couple of months ago and used the techniques I learnt on this LO too. It's a fantastic way to use up scraps as well as create an artistic mixed media page. Photo is one I took of Ben wandering down the road during our recent weekend away. Beechmont is such a beautiful location and there was a lovely lookout just past the trees in the photo.


This is also my second DT project for Scrapmatts and they let us go free choice for the final project. I used it as a chance to do something very un-Christmasy and show off their fantastic nature pieces. 
Scrapmatts used: CB1146 Leaf Spray 01; CB1209 Scrap Words 12; CB6086 Twig Frame 01; CB1188 Birds 06; CB5110 Layered Owls 02

Wednesday, 18 December 2013

Christmas Love - Scrapmatts DT

The Scrapmatts DT continues the Christmas theme in December. Despite having done Christmas projects for the 3rd month in a row I am still loving creating these. For one, I love Christmas but I also love the range of Scrapmatts chipboard available for Christmas.


The brief for this project was to use the below great sketch by fellow DT member Anne and create a LO with the theme 'All I want for Christmas...' including a photo of you. My photo shows my with the cute ladybug pillowpet my secret santa gave me at work last year, I love it! The journalling is on a pull out tag and talks about how this year the only thing on my wishlist is a chance to catch up with my family.


Lots of different Scrapmatts goodness on this one: CB6082 Christmas Trees 04; CB1183 Christmas Ornaments 10; CB1213 Scrap Words 15 and the stars which I can't seem to find the code for. :(


Monday, 9 December 2013

Christmas Stockings

I have certainly gone overboard with the hand-made Christmas decorations this year and the craziest part is they are all for work! This weekend I spent sewing some cute stockings for all the people who work in my 'pod' or cubicle group.


It has been quite a while since I did any significant sewing other than borders in scrapbooking layouts. I modified a pattern I found on line for these stockings and while I made a MESS of the first attempt, it was actually quite a simple process. I have received quite a few compliments from people at work about these.


Here is a close up of two of the stockings so you can see the fantastic Scrapmatts chipboard I used to embellish the MDF letters.


The colour scheme of the stockings also suits the current challenge over at one of my old Design Team blogs, The Lollipop Ladies, so I'm entering them there.


 Lastly, because Christmas is always better with glitter, here is a beer bottle I've coated in glitter to hold some fake berries. I think it's pretty cute. :)

Wednesday, 4 December 2013

More Christmas Decorations

After completing the advent calendar earlier this weekend I was in the mood for continuing to make more Christmas decorations. I had seen an amazing frame and bauble set up on Pinterest and decided to try my hand at re-making it. My frame is a lot smaller but this was such a simple project to make and looks so effective. I actually made this in the time it took my husband to play a game of basketball!


I also decided to re-make the centre panel for my old Advent Calendar. This is a pretty simple design but I think it works. I made all three of the trees at the bottom and I have to say they were all SUCH a pain. There is no way I will be trying to make similar ones ever again. How good is that gold glitter tape at the bottom? Love $2 store purchases some times. :)
 

I am entering this into the Use It Tuesday challenge which is Anything Goes! All the challenges require you to use hoarded supplies. I have re-used the calendar I originally made in 2010 and updated it using some left over Christmas papers from previous years and twine I have kept from various flower bouquets I have received.

Monday, 2 December 2013

2013 Advent Calender - UnstampaBelles DT

Ben and I used to buy advent calendars from the supermarket when we first moved in together. Back in 2010 though I decided I wanted to have a more lasting calendar which we could fill with whatever lollies we wanted so I grabbed a Kaisercraft kit and set to work, you can see the end result here. Recently I started to feel like committing to another in-depth project and remembered how much fun it was to create the calendar. I thought I might be able to showcase some new techniques and skills I had picked up in the last three years so decided to buy another kit and create a second calendar.


I went with a silver/white/blue theme this time around rather than more traditional red/green/gold. Painting all the MDF pieces really added to the construction time, project took me two weekends this time around. Most of the embellishment chipboard is from Scrapmatts. Regular blog-followers will know how much I love their products and their Christmas designs are always my favourites. I've used a mixture of old designs and new ones, like the chipboard tree which I just had to pick up as soon as I saw it.


This is also my DT piece for UnstampaBelles this month, our theme is Christmas so I'm really hoping to see lots of entries this month. This will be most last month on their DT as I've decided not to renew my position. The owner, Merry, is also stepping down by one of the other DT members will be stepping up continue running the challenges.

Prize for December Challenge includes:
Laser cut cards and card fronts - Christmas Designs
Card front designs pre-holed ready for stitching.
Card front designs with the stitching pattern printed on the card.
Christmas stickers.
3 types of star brads
Christmas foil shapes
Four pads of Sticky Notes


I am also entering the calendar into two more challenges:
Inkido's December challenge is to use stars and/or snowflakes. I've used multiples of both in this project.
Frosted Designs have a 'Pick 11' challenge running at the moment. From their list of things I have used Stars and Buttons.

Monday, 25 November 2013

Blog Candy Giveaway

It has been quite a while since I've shared a blog candy giveaway on my blog but I couldn't go past the one currently on offer over at Scrapfriends.
 

Tuesday, 19 November 2013

Timeless Love - Scrapmatts DT

The second design team brief of November was 'Gift Giving', I chose to create a present for my Nana. The Scrapmatts painters trays make fantastic gifts or keep them for your own home decoration. This tray features photos from my Nana and Pa's wedding day and a photo of the two of them taken a couple of years ago.

 
The green vine is from one of my favourite packs so I'm a little bit sad that I have now used it all up. I also used up some bits and pieces from various class kits I have accumulated. I always used to do a Scrapmatts class whenever I went to a craft show and they always give very generous packs so you have enough chipboard to make some extra cards when you get home.


Here is a close up to show of the crackle finish of the frame and light gloss on the title pieces.

Scrapmatts pieces used: CB2020 Vines 01; CB1134 Assorted Words 01; CB1199 Scrap Words 07; CB7006 Printer's Tray 02.

Frosted Designs has their fortnightly challenge as 'Give a Gift!' so I thought I'd enter this there too.

Monday, 18 November 2013

Hanging Stars - Scrapmatts DT

Chipboard has long been one of my favourite scrapbooking embellishments for two simple reasons: it is versatile and you can often use both sides. This Christmas ornament utilises both aspects. The hanging stars kit has a pretty standard way of being assembled but if you want to think outside the box you can also use it in so many different ways. I encourage you to check out the Scrapmatts gallery here for further inspiration.


I chose to use the filigree pieces separately to the solid stars and have them all hanging at different heights from silver thread. The filigree pieces have all been coated with silver embossing powder for a metallic shine.


Scrapmatts pieces used: CB5097 Hanging Stars 01, CB1185 Christmas Ornaments 11.

Sunday, 17 November 2013

Life is Better When You're Laughing

Wow, it's been quite a while between layouts for me. Oops! I have been trying to re-organise my craft room in the hopes that will get me re-motivated. I'm about halfway through so still looks like a bomb has hit it but hopefully I'll finish it off this weekend. Of course, after playing my all my supplies I got the urge to create something so took a quick break to come up with this layout.


I was inspired by the current challenge over at Once Upon A ... Sketch. The challenge is 'My Happy Place', so I knew right away I wanted to use a photo of myself and my husband because my happy place is always next to him. This photo was perfect because we had such a good day at the Pet Porpoise Pool. Ben got to play catch with a dolphin and I got to swim with a seal! Here is the sketch:


Don't forget, the challenge for this month over at Unstampabelles is vellum. I recently saw two amazing layouts (by Fiona and Jennifer Grace) which used vellum/transparency to create shaker pockets and I just had to give it a go myself. You can see in the close up the wood veneer and sequins I have included in my pocket. If you want to try it yourself my tip would be to make the vellum slightly larger than the backing paper so it bubbles up slightly. I didn't do this and so my sequins don't have much room to move around in.

Monday, 4 November 2013

Celebrate Beautiful Life Tag - UnstampaBelles DT

The challenge for November over at UnstampaBelles is to use vellum in your project. I have created a happy little tag using Scrapmatts chipboard and some die-cut vellum flowers. All of the colouring is done using Gelatos. I'm still learning how to use these but they are a lot of fun.


Here you can see a close up of one of my flowers. I rubbed the edges with the Gelato, then spritzed with water and then lightly scrunched when dry. 


Here is the fantastic prize pack from Beth - Huggies Crafts
 consists of:
·         15 x A4 Sheets of card-stock
·         Jenni B Ovals
·         2 pkts of 12 Felt Christmas Icons
·         1 x Making Memories Sheer Frame
·         1 x 1mx9cm Wide Burlap Ribbon
·         1 pkt crafty bitz
·         1 pk Forever Friends Elements
·          2 Pks say it with Crystals
·         1 Pk Bazzil Basic Organza flowers.

Sunday, 3 November 2013

Weekend Away at Beechmont

My husband Ben and I decided it was time to take a quick romantic break after realising the last time we went away was in January this year. We live on the Gold Coast in Australia, which is known as a tourist destination for it's beaches and theme parks but it is only about an hours drive before you are in some lovely mountains and rainforests. We decided to head to Beechmont and stayed at the amazing Old Saint John's Church.


The renovation inside was lovely, with a bedroom on a mezzanine level and open plan living area on the ground floor. Just across the road was this fantastic view out over the mountains


I had never previously been up to see the sun rise but I figured the view would be so amazing and the church didn't have any window coverings so it got light inside very early. Even more suprisingly though, Ben also got up with me at 4.30am (he normally gets up around 10am on weekends) so we drove 5 minutes down the road to the look out and waited from the sunrise. It was magical!


Sunday, 20 October 2013

Christmas Artist Trading Cards - Scrapmatts DT

The second Scrapmatts DT brief was to create a Christmas theme ATC. I love the range of different shaped bases available so I decided to use three different ones and decorate them in a similar style.


Pretty quick and easy design:
1/ Cover chipboard and words with gesso and let dry.
2/ Spray red and green dylusions ink from opposite ends, sprinkle with salt to get fluctuations in colour.
3/ Run a gold ink pad around the edges.
4/ Stamp versamark flourish design over background and emboss with clear UTEE.
5/ Heat emboss the amazing reindeer designs in gold.
6/ Adhere film strip and chipboard to bases.
 

The film strip was a bargin item I picked up from Reverse Garbage in Brisbane. I got two 10 meter rolls, one green tinged and one red tinged, for $4 each! So much cheaper than getting the Tim Holtz versions. :)


Scrapmatts chipboard used: ATC10-004, ATC10-008, ATC10-010, CB5050, CB5097.


Friday, 18 October 2013

Snow Season - Scrapmatts DT October

This is the first layout I created at the Noosa Retreat however it is also one of my design team pieces for Scrapmatts so I couldn't share it until my reveal day today. The photos are from my holiday to America in late 2012/early 2013, specifically Boston Common on 30 December 2012. Ben and I were scheduled to drive from Boston to New York that day so it was the ONLY day of the holiday we didn't want snow, in typical fashion a snow emergency was declared the night before and that ended up being the only snowfall we saw all trip. :P

(Removed for publication consideration)

 The brief for this one was to take something old (chipboard) and make it NEW. I took the old leftover chipboard negative from the snowflake design and turned it into a feature of the layout by painting it with gesso and Gelatos and backing it with gyprock tape. I have also painted up so of the cute snowflakes to run down the left side, used the tree and typewriter letters and used just one half of the 'Seasons Greetings' piece for my title.


The overall technique here was using one I learnt from Georgia Heald's online class. So versatile and a great way to use up the scrap pieces of paper you wouldn't normally use. I was also inspired by the current sketch over at Creative Scrappers #252.


Tuesday, 15 October 2013

Cherish Forever - RIP Pa

So back on 7 October 2013 I wrote about some issues in real life which had kept me quiet on the blogging front. My grandpa passed away on Tuesday 24 September 2013. He was first diagnosed with prostate cancer back in 2003, treatment was successful and life moved on. However, in 2008 tests showed the cancer had returned and over time, despite multiple treatments, the cancer spread to other parts of his body. In late 2012 it was deemed terminal and it was just a waiting game since then. Towards the end he was in a lot of pain almost constantly so whilst his passing is gut-wrenching there is also a sense of relief.
 
(removed for publication)

These photos are two of my favourites from my wedding in 2011. I had held on to them for a special layout and decided they would be perfect for a tribute page. There is no journalling because the pain is still too raw to put into word but I might add some later.


I used the Scrapfriends sketch for October as the inspiration for this layout. The sketch was so fantastic and full of details that I kept to it almost exactly other than to rotate it to the right and remove one of the photos.


Frosted Designs have a fortnightly challenge of kraft, flair and chipboard at the moment, so I'm also entering this LO into their competition.

Sunday, 13 October 2013

So Proud - Noosa Retreat Class

Ann ran a series of additional classes at the Noosa Retreat which you could sign up for during the weekend. I only chose to do one extra class but really like the end result. The focus of this class was using different embellishments on your page so this includes metal filigree pieces, press studs, die-cuts, pearls, and irridesent medium.


Here are some close ups of all the different hot air balloons we created. Best part of this class was the fact I got to go have a massage during part of it and Ann cut out all the balloons for me! LOL The chipboard letters were part of my lucky door prize, because I forgot to bring ANY of my alpha stickers to the retreat. Certainly added another level of challenge to the weekend. :)


Saturday, 12 October 2013

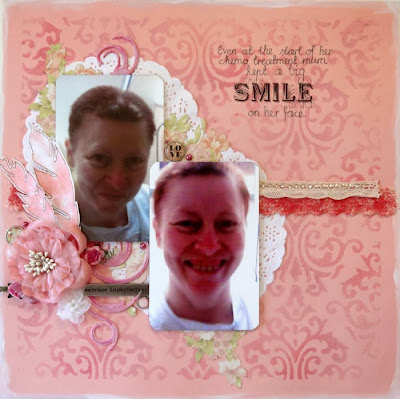
Smile - Pink for Breast Cancer Awareness

I am hosing a Girls Night In to fundraise for the Cancer Council tonight and thought I would do up a pink themed layout to feature on the night. Photos are of my mum when she had to shave her head during her chemotherapy treatment in 2010. Despite undergoing a complete double mastectomy and six months of chemo treatment, she maintained a positive outlook and often had a smile on her face. She remains cancer-free today which is a great result! Unfortunately my paternal grandmother passed away from breast cancer about 20 years ago, early detection and advances in cancer treatment are so important which is why I'm hosting the fundraiser. If anyone is interested in donating, the fundraising page is here:


I used the beautiful Kaisercraft mask and two different coloured inks to create the background. The feathers were my first time using foam stamps from A2Z Scraplets and also the first time I had used some Gelatos I purchased when in Melbourne. I think they will take a bit of getting used to but I'm excited by my initial attempts. I also used a couple of brads from a funky pack I purchased, another Tim Holtz metal tag and a Flourish with a Bling swirl which I coated with gesso to tone down the hot pink colour a bit.


 This layout was inspired by the challenge over at Once Upon A... Sketch. Their journalling challenge was to document "The Journey..." so I chose the start of mum's chemo journey. Nadia created this lovely sketch to work from.

Friday, 11 October 2013

Hens Party - Retreat Class

There is always a class included in the cost of the Noosa Retreat and this year we had the lovely Sue Smyth come to teach us. It was a very intense class with lots of instructions to follow. I have used photos from my hens party back in 2011 which I hadn't gotten around to scrapping yet. We did a burlesque dancing class followed by a life drawing session, hence the costumes and well-muscled gentleman. If anyone is looking for a venue for a hens party around Melbourne I can certainly recommend Hens Love Art in St Kilda. In fact, after checking out their website it looks like they have upgraded their venue since I attended so it would be even better now!
 

 Most of the other ladies at the retreat had never used gesso or templates so this class just blew their mind. LOL I think the layout looks a little bit too busy for my tastes and I'm not really convinced the colours work together but I did learn a couple of new techniques. The colouring technique used on the chipboard gate piece looks amazing and was repeated on a couple of layouts through out the retreat by some of the other participants. We also learned how to make the flowers using die-cuts. There was a lot of painting, misting, scrunching and stamen building involved but they do look pretty incredible.


Wednesday, 9 October 2013

Peace Love Joy - Rockerfeller Centre Christmas Tree

Here is the second challenge layout from the Noosa Retreat. This one came with a sketch, the green cardstock and the light brown grid paper which had the most beautiful designs on the other side but I just couldn't get them to work for this layout. Does anyone else do that? I've found I have done it a lot recently where I have purchased a paper for the pretty front but ended up scrapping it using the back. LOL


Anyway, photos are from our USA trip at the end of 2012/start of 2013. We went to the Rockerfeller Centre and couldn't resist getting some photos taken with the tree in the background. The rest of the papers and the die-cuts are Kaisercraft's Twig and Berries which I think was a collection from last year. The ornate stars are Scrapmatts and I finally found some of those wood veneer mini stars too so I've sprinkled a small trail.


I rotated the sketch to suit my portrait photos. You can see everyone else's interpretations of the sketch below. You can even see the basic sketch in the second photo.


All the ladies voted for the favourites for this challenge too and I was very surprised to find I came second! Here is a photo of me with the lady who came first, she had very cute photos of a donkey on her layout. I won another Kaisercraft pack so have a lot more scrapping I can do now. :)